![]()
Wispy lashes have taken the beauty world by storm, offering a soft, airy, and feminine look that enhances the eyes without appearing heavy or overly dramatic. Unlike the uniform and sometimes rigid appearance of traditional eyelash extensions, wispy lashes create a delicate, textured effect that feels both effortless and glamorous.
For many, achieving this look can seem intimidating, but using lash clusters simplifies the process, making it accessible for beginners and seasoned lash artists alike. In this guide, we’ll walk you through everything you need to know about creating stunning wispy lashes with clusters, including the tools, techniques, and expert tips to ensure flawless results.
Tools and Products You’ll Need
Creating wispy lashes starts with having the right tools and products at your disposal. High-quality lash clusters, adhesive, and precision tools make all the difference between a professional-looking finish and a messy application.
- Wispy Lash Clusters: The core of your look. Look for clusters with varied lengths and a feathered texture to mimic natural lashes. Options from brands like HEYME BEAUTY are ideal because they are lightweight, soft, and easy to manipulate, perfect for layering and customizing styles.
- Lash Cluster Bond and Seal: A reliable adhesive ensures clusters stay in place all day without irritation. HEYME BEAUTY’s bond and seal combo works well for both beginners and pros, offering quick drying time with a strong hold.
- Precision Tweezers: A fine-tipped pair allows for exact placement of clusters, even in tight corners or layered patterns. Angled tweezers can help when positioning clusters at the inner or outer lash line.
- Optional Tools: Lash applicators or silicone brushes for blending, eyelash curlers for prepping natural lashes, and small scissors for trimming clusters if necessary.
Having everything prepped and within reach before starting can save time and prevent frustration mid-application.
What is Wispy Lash Clusters
Wispy lash clusters differ from traditional uniform clusters in both structure and effect. Each cluster is composed of a few fine lashes grouped together, often in mixed lengths and with a subtle taper. This design allows for customizable volume and natural texture, giving the lashes an airy, fluttery look.
The benefits of wispy clusters include:
- Lightweight feel: Unlike denser extensions, they are easy on natural lashes and reduce tension.
- Customizable style: Different lengths can be layered or alternated to achieve a delicate, textured effect.
- Feathered appearance: The soft taper and mixed lengths emulate the natural growth pattern of eyelashes.
In contrast, traditional uniform clusters tend to be identical in length and density, which can look rigid and artificial. Wispy clusters let you create a more natural, three-dimensional lash line that complements every eye shape.
Preparation Before Application
Preparation is key to achieving a professional-looking wispy lash set. Proper preparation ensures better adhesion, longer-lasting results, and protects the natural lashes.
- Cleanse Natural Lashes: Remove all makeup, oils, and residues using an oil-free cleanser or gentle lash cleanser. Any leftover residue can compromise the adhesive, causing clusters to fall off prematurely.
- Organize Clusters by Length: Sorting your clusters beforehand makes the application smoother. Group short, medium, and long clusters separately to avoid confusion mid-application.
- Prepare Adhesive and Tools: Pour a small amount of bond onto a clean surface. Ensure tweezers, brushes, and applicators are sanitized. A well-organized workspace reduces errors and speeds up the process.
Good preparation is not just a step—it sets the foundation for a flawless, long-lasting result.
Step-by-Step Application Process
Recommended products
-

Cluster Lash Kit
-

At Home Lash Extension Glue
-

Best at Home Cluster Lashes
-

Best at Home Lash Extensions Kit
Now comes the fun part: building your wispy lash look with clusters. Follow these steps carefully for an even, feathery finish.
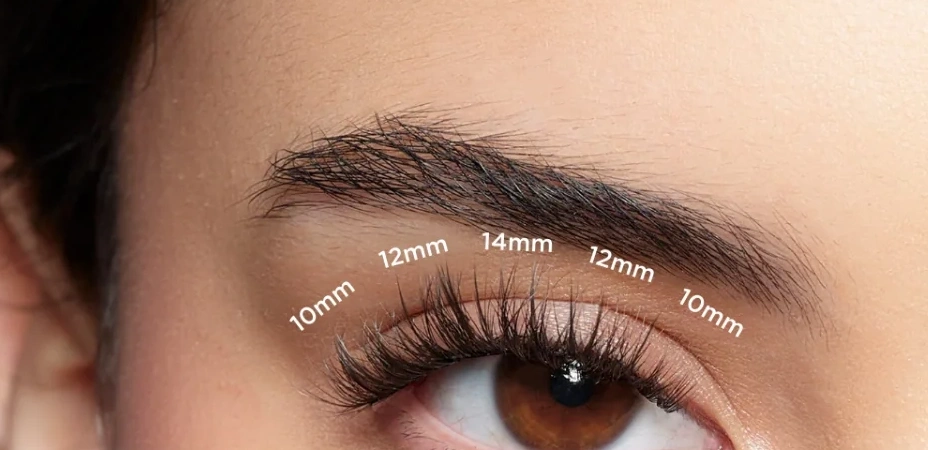
- Select the Right Cluster Size: Typically, shorter clusters go on the inner corners, medium lengths on the mid-lash line, and longer clusters on the outer corners. This creates a natural gradient that elongates the eyes.
- Apply Adhesive to the Cluster Base: Dip only the tip of the cluster into a tiny amount of bond. Overloading the cluster with adhesive can cause clumping or irritation.
- Place Clusters Strategically: Use tweezers to position each cluster near the base of your natural lashes. Start from the inner corner and move outward, ensuring each cluster blends seamlessly.
- Layer for Wispy Effect: Once the first layer is dry, apply additional clusters to areas needing more volume or texture. Alternate lengths slightly for a natural, feathery appearance.
- Adjust and Press Lightly: Gently press each cluster into place with tweezers or a brush to ensure full adhesion and alignment with your natural lashes.
Patience during this process pays off—rushing can lead to misaligned clusters or clumping.
Tips for Achieving a Perfect Wispy Look
Creating the perfect wispy lashes involves attention to subtle details. Here are expert tips to enhance your results:
- Shorter Clusters on the Inner Corners: This ensures a natural transition and prevents a “spiky” appearance.
- Alternate Lengths: Mix medium and long clusters along the lash line to create a feathered, airy effect.
- Avoid Overcrowding: Placing too many clusters can make the lashes look heavy. A lightweight finish feels more natural and comfortable.
- Use Seal: After placement, apply a seal to lock in clusters, reducing stickiness and helping them last longer.
- Check Symmetry: Step back and examine both eyes to ensure even placement and a harmonious overall look.
With these techniques, your wispy lashes will look effortlessly gorgeous, enhancing your eyes without overpowering them.
Removal and Aftercare
Proper removal and aftercare preserve your natural lashes and prolong the usability of leftover clusters.
- Use Lash Remover or Oil-Based Cleanser: Apply a professional-grade remover to dissolve the adhesive gently. Avoid pulling or tugging, which can damage your natural lashes.
- Protect Natural Lashes: Gently comb through lashes with a clean spoolie brush to separate any tangled clusters.
- Clean and Store Leftover Clusters: Keep unused clusters in a dry, clean container to maintain their shape for future use.
Regular maintenance and careful removal help maintain the integrity of both natural and extended lashes.
Common Mistakes to Avoid
Even seasoned lash enthusiasts can make errors. Being aware of common pitfalls can improve your results dramatically:
- Overcrowding the Lash Line: Too many clusters create a heavy, unnatural look.
- Applying Clusters Too Far from the Base: Placement too high on the natural lash can cause lifting or discomfort.
- Using Excessive Adhesive: Over-application leads to clumps and messiness.
- Neglecting Layering: Proper layering ensures a textured, wispy appearance rather than a flat, rigid look.
By avoiding these mistakes, you can achieve a more professional and flattering outcome.
Conclusion
Wispy lash clusters offer a stunning way to enhance natural beauty, providing soft, fluttery volume without the rigidity of traditional extensions. By understanding the tools, preparation steps, and techniques for layering and placement, anyone can achieve the perfect wispy lash look. Experimenting with lengths, curls, and placement allows for a customized, natural finish that complements your unique eye shape and style.
For beginners and professionals alike, HEYME BEAUTY lash clusters, bond, and tweezers are excellent tools to get started, ensuring comfort, durability, and a beautiful, textured lash result. With practice and attention to detail, wispy lashes with clusters can become a signature beauty staple that elevates your look with effortless elegance.
FAQs
Can I apply wispy lash clusters at home?
Yes, with proper tools, practice, and patience, beginners can achieve wispy lashes at home. Start with a few clusters at a time to build confidence.
How long do wispy lash clusters last?
With proper care, clusters typically last 1–2 weeks. Avoid rubbing your eyes or using oil-based products near the lashes to prolong wear.
Are wispy clusters safe for sensitive eyes?
Yes, if you use high-quality adhesive and avoid overloading lashes, clusters are lightweight and gentle on natural lashes.
Can I reuse leftover clusters?
Yes, clean unused clusters and store them in a dry, sealed container to maintain shape for future applications.
What is the difference between wispy clusters and classic lash extensions?
Wispy clusters are mixed-length, feathered, and layered for a textured look, while classic extensions are uniform and provide consistent length and volume.
How do I remove wispy lash clusters safely?
Use a professional lash remover or oil-based cleanser. Avoid pulling, and gently brush through lashes to remove clusters without damaging natural lashes.