![]()
Want fuller, fluffier lashes? Learn how to make handmade fan lashes! This step-by-step guide simplifies the process. We’ll cover everything from selecting the right lashes to creating perfect fans. Mastering how to make handmade fan lashes elevates your lash artistry. Achieve stunning, customized looks for your clients. Ready to create gorgeous fans? Quote handmade fan lashes from Heyme for premium quality.
What Are Handmade Fan Lashes?

Handmade fans are lash extensions carefully created by hand, offering a fuller, more natural look. You create them by picking multiple lashes and fanning them into a shape. This allows for a customizable volume that perfectly suits your client’s eye shape. Handmade fans give you control over the fan size, spacing, and curl, ensuring a unique and tailored lash extension.
These fans provide a lightweight feel while enhancing volume and density for a beautiful, long-lasting result.
How to Make Handmade Fan Lashes?

Here’s a table summarizing the preparation steps for making handmade fans:
| Category | Items Needed |
|---|---|
| Materials | Lash extensions (volume fans) |
| Lash adhesive/glue | |
| Lash trays | |
| Lash applicators | |
| Tweezers (for fanning and application) | |
| Lash primer (optional) | |
| Tools | Fine-tip tweezers (for creating fans) |
| Adhesive rings or cups for glue | |
| Lash glue remover (for fixing mistakes) | |
| Workspace Setup | Clean, well-lit environment |
| Disposable tools for hygiene |
Step 1: Preparing Your Tools and Materials
Start by cleaning your tweezers to ensure no residue or glue buildup affects the application. Set up your glue in an adhesive ring or cup, making it easy to access during the process. Organize your lash extensions by thickness, length, and curl so you can quickly grab the right one for the look you want. This organization keeps the process smooth and efficient, helping you maintain a clean workspace.
Step 2: Picking the Right Lash Extensions
Choose the appropriate length and thickness for the fan effect you aim to create. Consider your client’s eye shape and personal preferences. For a more natural look, select lighter, thinner lashes. For more volume, opt for thicker or longer extensions. Ensure the lashes complement your client’s natural lashes to achieve a balanced and flattering appearance.
Step 3: Creating the Fan
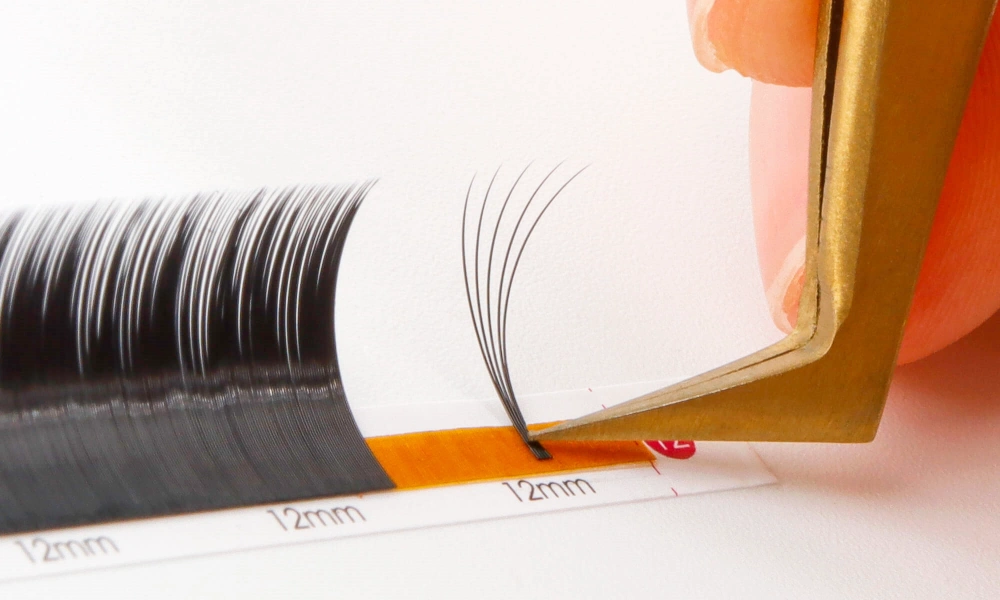
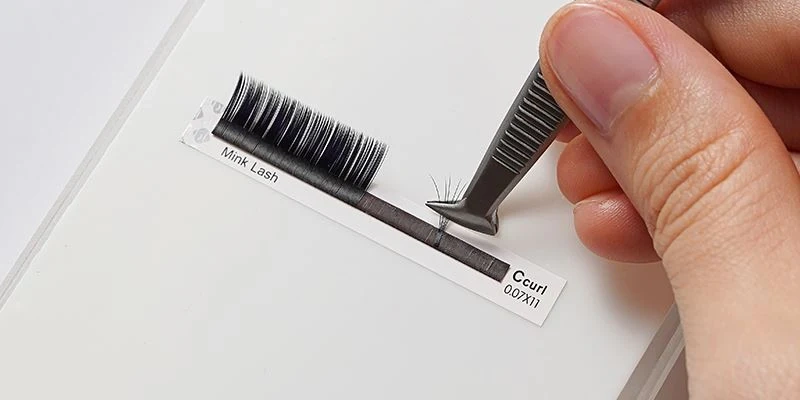
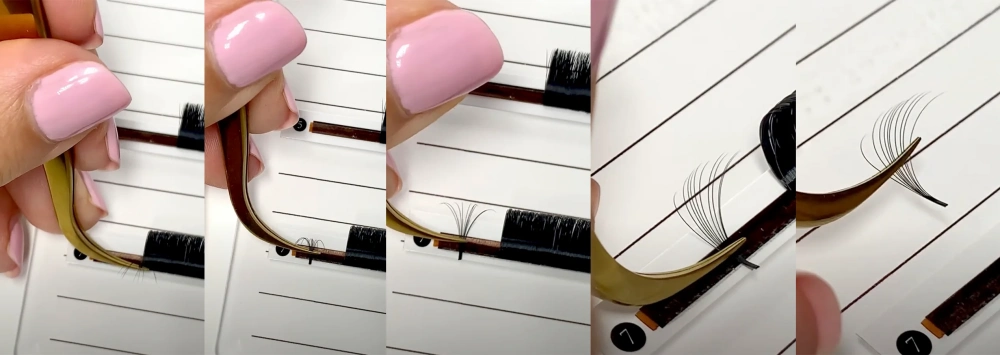
Using fine-tip tweezers, gently pick up multiple lashes from the tray. With a slight pull, arrange the lashes into a “fanned” shape, creating a fan that suits the desired volume. Apply a small amount of glue at the base of the fan. This secures the lashes together, forming a sturdy bond, and ensures the fan stays intact while you move on to the next step.
Step 4: Applying the Fan to the Natural Lash
Use a set of tweezers to isolate one natural lash, making sure it’s clean and free from surrounding lashes. Place the handmade fan onto the isolated natural lash, ensuring the glue bonds properly. Hold it in place for a few seconds to secure the fan. This technique ensures the fan sits well and doesn’t shift, providing a neat and structured look that lasts.
Step 5: Repeat and Adjust
Repeat the process by creating and applying more fans to the remaining natural lashes. Ensure the fans are evenly spaced and aligned for a uniform, full look. Adjust any fans if necessary to correct spacing or placement. Take your time to perfect the placement and make sure the final result is seamless, with no gaps or clumping between the lashes.
Tips for Achieving Perfect Handmade Fan Lashes

Use the Right Amount of Adhesive
When applying glue, make sure you use the right amount. Too much glue can cause clumping, while too little can make the fan weak and unsteady. The glue should have a consistency that is not too thick or runny. Apply just a tiny drop to the base of the fan to ensure it bonds firmly without excess glue spilling over. Getting this right ensures a clean and professional finish with long-lasting results.
Practice Makes Perfect
Mastering the fanning technique takes time, so practice regularly to improve your skill. Start by creating smaller fans before attempting larger ones. The more you practice, the more you will refine your technique, leading to consistent and beautiful results. Keep experimenting with different lash lengths, thicknesses, and fan sizes to develop a feel for what works best and to speed up your process.
Choosing the Right Lash Extension Type
Selecting the right lash extension type is key to achieving your desired look. Synthetic lashes are typically firmer and hold their shape well, while natural hair lashes offer a softer, more natural appearance. Consider the style and longevity you want for your client—synthetic lashes tend to last longer, while natural lashes can create a more lightweight, flexible result.
Choose based on the effect and wear time you aim to achieve.
Common Mistakes to Avoid
Too Much Glue
Using too much glue can create heavy, clumpy fans that look unnatural. It may cause lashes to stick together, resulting in a bulky, messy appearance. Apply only a small amount of glue to the base of the fan to keep the lashes lightweight and neatly separated. This ensures that each lash fan stays flexible and maintains its shape for a more natural, professional finish.
Incorrect Fan Size
Choosing the wrong fan size can impact the overall look of the lashes. If you use too many lashes, the fan may appear too thick, causing discomfort or an unnatural look. On the other hand, too few lashes can make the fan look sparse and weak. Tailor the fan size to suit the client’s natural lashes and desired volume for a balanced, flattering effect that enhances their eye shape.
Not Waiting Long Enough for Drying
Allowing each lash fan to dry properly before moving on to the next one is essential. If you don’t give enough time for the glue to bond, the fan can shift or fall off prematurely. Be patient and hold the fan in place until the glue is fully set. This ensures that the lashes adhere securely and stay intact for the long term, avoiding the need for adjustments later.
Maintaining and Caring for Handmade Fan Lashes
Aftercare for Lashes
To keep your handmade fan lashes fresh and long-lasting, advise your clients to cleanse their lashes gently every day. Use a lash-friendly cleanser that’s free from oils, as oil-based products can break down the adhesive and cause lashes to fall out sooner.
Encourage clients to avoid rubbing their eyes, and remind them to avoid sleeping on their face to prevent unnecessary pressure on the lashes, helping maintain their full, beautiful appearance.
How to Fix Lashes If They Become Loose
If any lashes become loose, remove them carefully to avoid damaging natural lashes. Use a lash glue remover to dissolve the adhesive without pulling on the natural lashes. After removal, reapply a fresh fan to the natural lash, ensuring it’s properly isolated and securely bonded. Using the right tools and taking your time ensures a safe and smooth process for both fixing and maintaining the overall lash look.
Conclusion
In conclusion, learning how to make handmade fan lashes requires practice, precision, and the right tools. By following each step carefully, from preparing materials to applying the fans, you can achieve flawless results. With attention to detail, you’ll create natural-looking, voluminous lashes that last. Ready to enhance your lash game?
Quote your handmade fan lashes from Heyme today and elevate your lash artistry with top-quality extensions that deliver exceptional results.
FAQ
What lashes do you use to make fans?
To make fans, use volume lash extensions that are lightweight and flexible. Choose lashes with the right curl, length, and thickness based on the desired fan effect. Common options include synthetic or mink lashes, depending on the look and longevity you want to achieve.
Do handmade fans last longer?
Yes, handmade fans can last longer if applied correctly. Since you customize the fan size and structure, you can ensure they adhere securely to natural lashes, reducing the risk of premature fallout. Proper care and maintenance also help extend their lifespan.
How many lashes should be in a lash fan?
A lash fan typically has 3 to 6 lashes, depending on the desired volume. You can adjust the number based on your client’s preferences for a natural or fuller look.
What is the difference between promade and handmade fans?
Promade fans are pre-made with glue at the base, while handmade fans are created by you using individual lashes. Handmade fans offer more customization and a lighter, more natural feel.
Can you pre-make your lash fans?
Yes, you can pre-make your lash fans. However, handmade fans are often preferred for a more personalized, custom look that fits each client’s natural lash pattern.
