![]()
Lash extensions have become an essential beauty treatment for many, and mastering the art of applying them requires precision and skill. One of the most important tools in this process is the lash extension tweezers. How you hold your tweezers can significantly impact your ability to apply lashes accurately and efficiently.
In this blog post, we will walk you through the proper technique for holding lash extension tweezers, which will not only improve your application but also enhance your comfort and control. Whether you’re a beginner or an experienced lash artist, perfecting your grip is key to achieving flawless results. Let’s dive into the right techniques and tips to help you hold your lash extension tweezers like a pro!
Why the Right Tweezer Grip Matters
When applying lash extensions, it’s essential to maintain control and precision to ensure the lashes are placed correctly. The right grip will help you achieve the perfect angle, enabling you to isolate individual lashes and adhere the extensions securely without causing damage to the natural lash.
Holding your tweezers properly can also help reduce hand fatigue, improve your speed, and minimize mistakes, all of which are crucial for creating high-quality lash sets.
Types of Lash Extension Tweezers
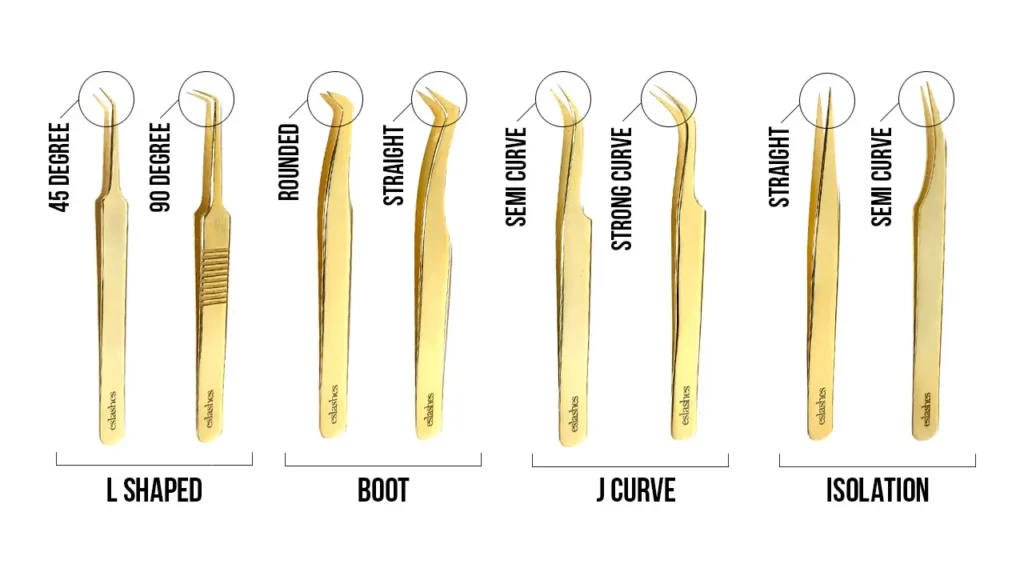
Before diving into the technique, it’s important to understand that there are different types of tweezers designed for specific tasks during the lash extension process. Each type of tweezer requires a slightly different grip.
- Straight Tweezers: These tweezers have parallel tips and are typically used for picking up and placing lash extensions. The straight design allows for a stable and controlled grip, making it the most versatile tweezer for beginners and professionals alike.
- Curved Tweezers: These tweezers have a slight curve to their tips, which makes them ideal for isolating individual lashes or placing the extension on the natural lash. They are often used in the application phase because the curve helps to avoid the eyelid and ensures a clean placement.
- Angled Tweezers: Angled tweezers are similar to straight tweezers, but with a 45-degree angle on the tips. They are excellent for precise isolation and placement, particularly when dealing with tight or difficult-to-reach lashes.
Understanding the type of tweezers you’re using will help you decide on the best grip. For the sake of this article, we will focus on the general method that works well with both straight and curved tweezers, as these are most commonly used.
How to Hold Lash Extension Tweezers
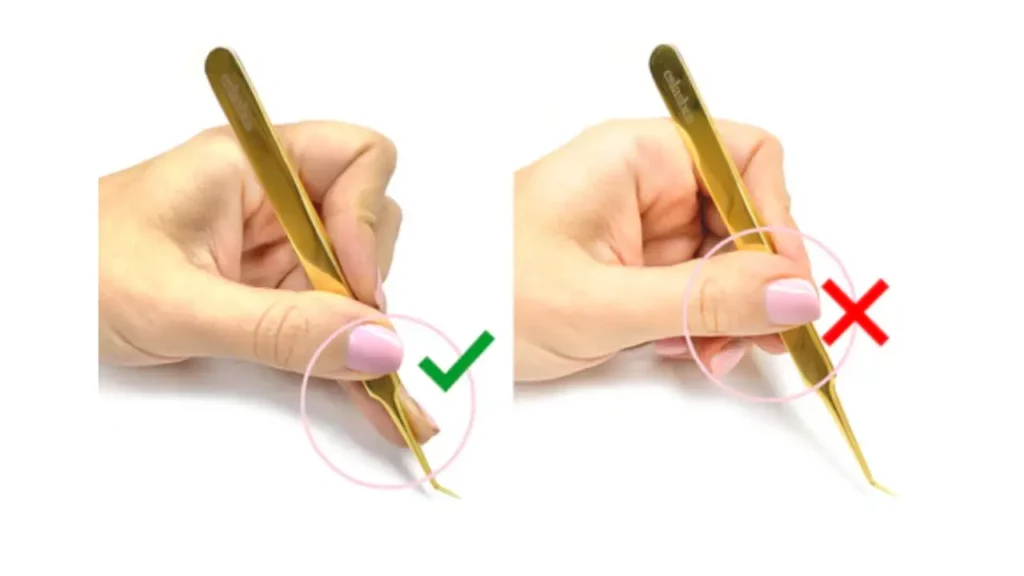
Here is the ultimate guide about how to pick up lash extensions with tweezer properly, without making damages to your lash extensions.
Proper Finger Placement
The first step in holding lash extension tweezers is ensuring your fingers are positioned correctly. Your grip should feel comfortable and secure, yet flexible enough to allow for the fine motor control necessary during application.
Here’s how to do it:
- Thumb: Place your thumb on the bottom handle of the tweezers, near the center or slightly closer to the end. Your thumb should press gently on the handle to provide balance and stability, but it shouldn’t feel forced or rigid.
- Index Finger: The index finger should rest on the top of the tweezer handle, near the middle or just before the tip. This will be your primary control finger, guiding the movement of the tweezers as you pick up, isolate, or place lashes.
- Middle Finger: Your middle finger should support the tweezers from the opposite side of your thumb. This finger helps to maintain balance, especially when making delicate, controlled movements. You can place it along the back side of the tweezer handle or on the edge if you prefer.
The Pinch Grip
Once your fingers are positioned properly, the next step is understanding the “pinch grip,” which is commonly used when holding lash extension tweezers. This grip is crucial for giving you the precision needed to pick up and place lash extensions accurately.
- The pinch grip involves using your thumb and index finger to pinch the tweezer handles together. The movement should be soft but firm, with just enough pressure to control the tweezer tips without causing them to collapse or slip.
- Avoid excessive pressure: Many beginners tend to grip the tweezers too tightly, which can cause hand fatigue and lead to unnecessary strain on the wrist. You should maintain a light, comfortable pinch. Think of it like holding a pencil: your grip should be controlled, but relaxed.
Positioning Your Hand
Once your fingers are in place, it’s essential to find a comfortable angle for your hand. This positioning will vary depending on the area of the eye you’re working on, but the goal is to maintain flexibility and control.
- Relax your wrist: A common mistake is to stiffen the wrist, which can cause discomfort and reduce dexterity. Keep your wrist relaxed and avoid twisting it awkwardly. A natural wrist position will give you better maneuverability.
- Use the wrist, not just your fingers: When working with tweezers, avoid using only your fingers to move the tweezers. Instead, engage your whole hand, including the wrist, to make smoother, more fluid movements.
Tweezing Technique
Now that your grip is secure, it’s time to move on to the actual application process.
- Pick up the Lash Extension: With your tweezers in the correct position, gently grip the base of the lash extension. It’s essential to grab it at the right point—too close to the tip of the extension and you risk dropping it; too close to the base and you may cause damage to the extension.
- Isolate the Natural Lash: Use your tweezers to isolate a single natural lash before applying the extension. This is where curved or angled tweezers come in handy, as their design allows for better access to isolated lashes without disturbing others.
- Placement: Once the lash extension is securely held, gently place it onto the natural lash, ensuring it sits correctly and is aligned with the natural lash line.
Common Mistakes to Avoid
- Too Tight of a Grip: Gripping the tweezers too tightly can cause muscle strain and make it difficult to achieve the fine motor control needed for lash application. Maintain a light, relaxed grip.
- Incorrect Angle: Holding your tweezers at the wrong angle can make it difficult to isolate lashes or apply extensions correctly. Always ensure your hand is at a comfortable and natural angle for both you and the client.
- Using the Wrong Tweezer Type: Choosing the right tweezer type for the task at hand is crucial. For example, using straight tweezers for isolation or curved tweezers for picking up extensions can result in inaccurate placement or difficulty during the application.
- Not Practicing Enough: Precision comes with practice. Spend time practicing with your tweezers to develop muscle memory and improve your technique.
How Do You Hold Your Hand When Lashing
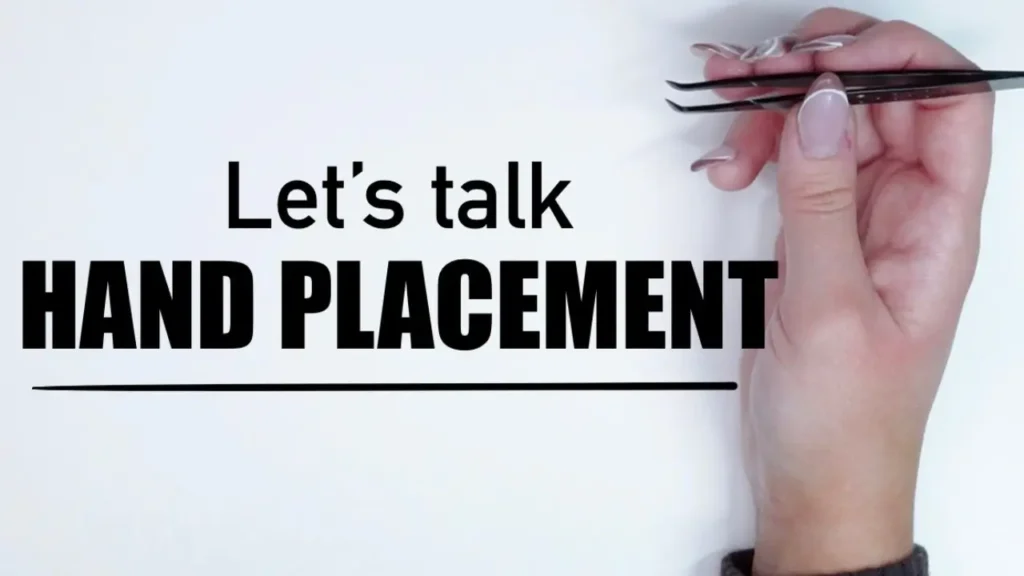
When applying lash extensions, the position of your hand and fingers is just as important as the technique and tools you use. Holding your hand correctly during a lash application helps ensure precision, comfort, and control, all of which are key to creating a flawless set of lashes. In this guide, we’ll cover the best hand positioning for lashing and explain how to reduce strain and improve accuracy.
1. Relaxed and Natural Hand Position
One of the most important aspects of holding your hand when lashing is maintaining a relaxed and natural position. Tension in your hand or wrist can cause fatigue and make it harder to achieve delicate, precise movements. Here are a few tips to keep your hand relaxed:
- Avoid Tension: When lashing, try to avoid gripping your tweezers or tools too tightly. Your hand and fingers should feel comfortable and relaxed. Tension can cause cramping and limit your range of motion.
- Use Your Whole Hand: Instead of only using your fingers, engage your entire hand, including your wrist, to move the tweezers smoothly. This will allow you to make finer, controlled adjustments and minimize hand fatigue.
- Maintain Flexibility: Your wrist should remain flexible, rather than stiff or rigid, to allow for a smooth and fluid movement as you work. A stiff wrist can cause discomfort and limit your dexterity, which can affect your lash placement.
2. The Best Finger Placement
The way you hold the tweezers, along with the positioning of your fingers, plays a big role in the control you have during the application process. Proper finger placement helps guide your movements and ensures you don’t over-grip or lose control of the tool.
- Thumb: Place your thumb on the bottom of the tweezers handle, near the center or closer to the end. Your thumb should press gently on the handle to provide balance and control.
- Index Finger: The index finger should rest on the top of the handle or slightly towards the front of the tweezer tips. This will act as your main guiding finger, providing most of the control when isolating lashes or placing extensions.
- Middle Finger: Place your middle finger lightly along the back of the handle. This helps stabilize the tweezers and keeps them balanced in your hand. For some, this may feel more natural than using the ring finger.
3. The Pinch Grip Technique
The pinch grip is a popular and effective way to hold your tweezers during lash application. This technique involves using your thumb and index finger to “pinch” the tweezers together. This gives you a firm but relaxed grip that helps with both precision and control.
- Gentle Pressure: When using the pinch grip, don’t apply too much pressure—just enough to hold the tweezers securely without causing strain on your hand. A relaxed grip will give you more control and reduce the chance of mistakes.
- Correct Tweezer Hold: The pinch grip should be applied on the main body of the tweezers, not near the tips. Your grip should allow for smooth, controlled movements as you pick up, isolate, and place lashes.
4. Wrist and Arm Positioning
Your hand’s position is closely connected to your wrist and arm alignment. Proper wrist and arm positioning will give you better control over the tweezers and reduce strain.
- Neutral Wrist Position: Keep your wrist in a neutral position, meaning it’s neither bent up nor down. A straight wrist allows for more fluid and natural movements, helping you avoid discomfort during longer sessions.
- Comfortable Arm Placement: Ideally, your arm should be at a comfortable angle, with your elbow resting slightly bent by your side or on the armrest of the client’s chair. This keeps the muscles relaxed and avoids overextension. A stiff arm or shoulder can cause tension, leading to fatigue.
5. Hand Positioning for Different Parts of the Eye
When lashing, your hand positioning will change depending on which part of the eye you’re working on. Flexibility in your hand and wrist positioning is important to ensure you can comfortably reach all areas of the eye without causing discomfort for yourself or the client.
- Outer Corner of the Eye: When working on the outer corners, your hand may need to be positioned at a slight angle. Keep your wrist neutral and make sure your grip is steady and relaxed. For best results, use angled or curved tweezers that help you maneuver around the natural curve of the eye.
- Inner Corner of the Eye: For the inner corner, your hand may need to be positioned closer to the client’s face, with your wrist slightly tilted or angled. Don’t over-extend your wrist—ensure that it remains relaxed, and use your entire arm to make any necessary adjustments to the tool.
- Under the Eye: When applying lashes to the lower lash line, it’s important to keep your hand steady while maintaining a light touch. Position your wrist and hand in a way that allows you to work comfortably without straining your arm or wrist.
6. Reducing Hand Fatigue
Lashing for extended periods can put strain on your hand, wrist, and forearm. It’s important to keep your muscles relaxed and avoid overexertion. Here are a few ways to reduce hand fatigue:
- Take Breaks: Regular breaks during your lashing session will give your hand and wrist time to rest. Stretch your hands and wrists during breaks to alleviate any tension.
- Use Ergonomic Tools: Consider using ergonomic tweezers designed for comfort and less strain. Tools with cushioned handles or adjustable grips can help reduce the amount of pressure needed to hold them.
- Change Hand Positions: Don’t be afraid to switch up your hand positions during long sessions. Shifting the grip and angle of your hand from time to time will reduce strain and prevent repetitive motion injuries.
7. Practice and Patience
As with any skill, developing the right hand positioning for lashing takes practice. If you’re new to the lash extension industry, it may take some time to get used to holding your hand in the most efficient and comfortable way. Be patient with yourself and practice on mannequin heads or during training sessions.
How to Pick Up Lash Extensions

Here’s how to pick up lash extensions, keeping the 90-degree angle with the lash strip in mind:
Step 1. Prepare Your Workspace
- Organize your lash tray: Arrange your extensions by length and curl for easy access.
- Prepare your tweezers: Ensure your tweezers are clean and free of any adhesive residue.
Step 2. Pick Up the Lash Extensions
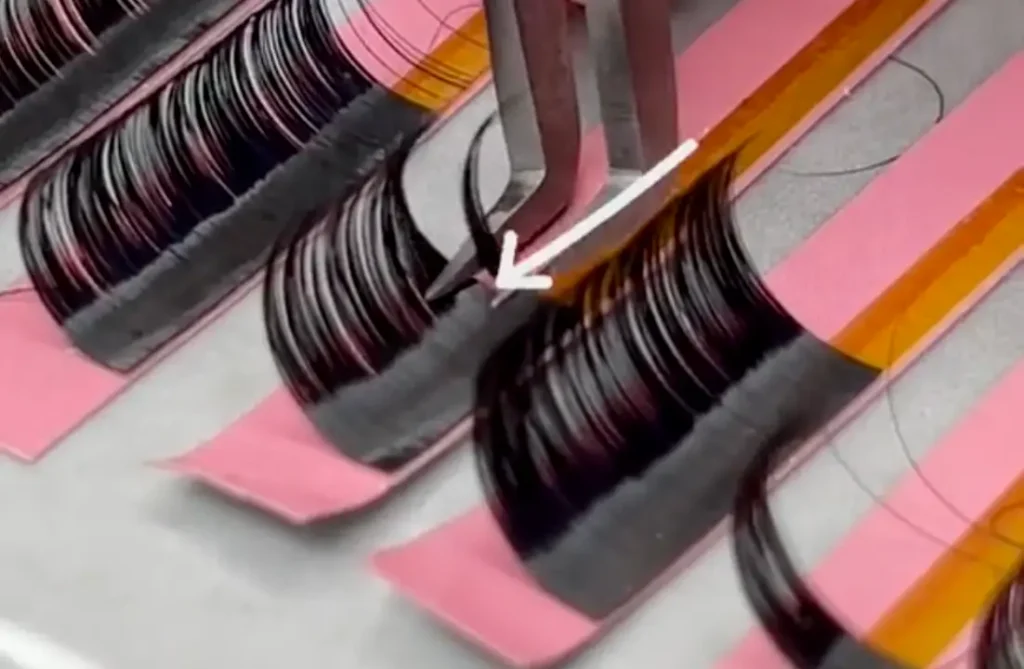
- Hold the tweezers at a 90-degree angle to the lash strip. This ensures you pick up the extensions from the base and prevents bending or twisting.
- Gently grip the base of the extension(s) with the tweezers. For classic lashes, pick up one extension at a time. For volume lashes, pick up the desired number of extensions to create a fan.
- Maintain the 90-degree angle as you lift the extension(s) from the strip.
Step 3. Create a Lash Fan (for Volume Lashes)
- Gently fan out the extensions. Use the tips of your tweezers to carefully separate the extensions into a desired fan shape.
- Ensure the base of the fan remains intact. This is crucial for proper adhesion.
Step 4. Dip in Adhesive
- Dip the base of the extension(s) or fan into the adhesive. Only dip the very base to avoid excess adhesive.
- Remove any excess adhesive. Gently tap the tweezers on the adhesive tray to remove any drips.
Step 5. Apply to Natural Lash
- Isolate the natural lash. Use your isolation tweezers to gently separate the natural lash from the others.
- Apply the extension(s) to the natural lash. Place the extension(s) as close to the base of the natural lash as possible, maintaining a slight curve to match the natural lash’s direction of growth.
Key Considerations:
- Practice makes perfect: Consistent practice is essential to develop smooth and efficient picking up techniques.
- Observe experienced lash artists: Watch their techniques and try to emulate their movements.
- Use high-quality tweezers: Investing in good quality tweezers can significantly improve your control and precision.
By consistently practicing these steps and maintaining the 90-degree angle, you’ll improve your lash application technique and achieve more beautiful, long-lasting results.
Conclusion
In conclusion, holding lash extension tweezers to pick up eyelash extensions properly is key to achieving precision and flawless results. By practicing the right grip and hand positioning, you’ll improve your efficiency and reduce the risk of errors, making your lash application process smoother and faster. Whether you’re just starting or looking to refine your skills, these tips will help you become more confident and precise in your work.
Ready to take your lash extension game to the next level? If you’re in need of high-quality lash extensions at competitive prices, we’ve got you covered! Contact us today to explore our wholesale options and get premium lash extensions delivered directly to you. Start enhancing your business with the best products on the market!


