![]()
In the bustling world of beauty treatments, few procedures are as coveted—and as delicate—as eyelash extensions. Clients walk in looking for that extra flutter and leave with added confidence. As manufacturers and wholesalers of premium lash extensions, we know the thrill and the responsibility behind each application. But with great enhancements come equally great responsibilities. One of the most crucial steps in offering a safe and professional service is the eyelash extension skin patch test.
You might think: “My client’s had lashes before and was fine,” or “I’ve used this adhesive for years with no problem.” However, sensitivities can develop over time. That’s why this seemingly simple test—often just a small sample—can save you from major setbacks: allergic reactions, unhappy clients, reputational risk, and even insurance issues. Our aim in this article is to share not just the “how” but the “why” behind patch testing, grounded in our experience supplying lash-techs globally, supported by industry insights, and backed by real client feedback.
Whether you’re a seasoned lash artist who wants to refine your process or a brand-new technician building trust with your clientele, the information here will help you deliver safe, high-quality results every time. From better client satisfaction and fewer complications to standing out as a true professional—understanding and implementing a proper patch test is a strategic investment in your craft and business.
What is a Patch Test?
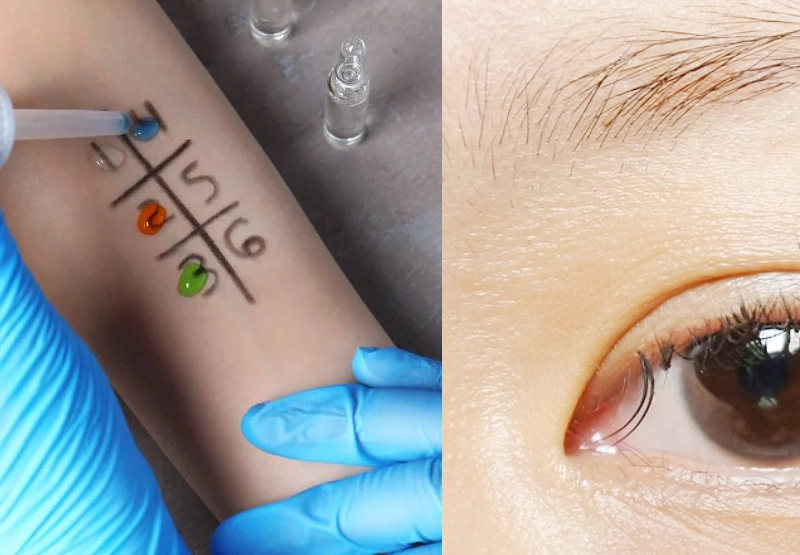
A patch test is a simple but important check used across beauty and medical fields to determine whether a person may have an allergic reaction to a product or substance. According to Wikipedia, a patch test (in immunology/dermatology) is used to identify substances causing allergic inflammation of the skin — typically involving applying allergens to a small discrete area and observing for reactions over 48-96 hours.
In the context of eyelash extensions, a “skin patch test” (or “lash patch test”) is a version of this concept tailored for lash adhesives and extensions. Essentially, you test a small amount of the product (or apply a few lash extensions using the product) on a very limited area before proceeding to apply a full set. This allows you and the client to monitor for any adverse reaction before committing to the full treatment.
To put it plainly: it’s a safety “mini-trial” of the products you’ll use in the full session. By doing this, you’re not only protecting the client’s eyes (a highly sensitive area) but also safeguarding your professional reputation and reducing liability risks.
In summary: Without a patch test, you’re applying a full lash set without confirming whether the client’s skin (or sensitive eyelid area) will be comfortable with your chosen adhesive and other materials. That’s why many reputable lash studios make it standard protocol.
Why It’s Important for Eyelash Extensions
When you’re working around the eye area, you’re dealing with one of the most delicate and exposure-prone parts of the body. Eyelid skin is thinner, more vascular, and in constant motion. That means even minor irritation can become uncomfortable for the client, and major irritation can compromise lash retention, cause swelling, discharge or worse.
Here are key reasons why a patch test is vital:
- Allergic reaction risk: The adhesives used in lash extensions often contain cyanoacrylate (for bonding) and carbon black dye (for black adhesives). These ingredients can trigger reactions such as redness, itching, swelling, or even dermatitis in sensitive individuals.
- Changing sensitivities: Even if a client has had lashes before without issue, sensitivities can develop over time — perhaps due to changed health status, medications, different adhesive brand, or cumulative exposure. One discussion on Reddit noted: “Patch tests are not 100% certain … someone could be getting lashes done for 10 years and one day develop a reaction to a glue or even the gel pads…”
- Liability & business protection: Performing a patch test signals professionalism and shows you are taking the client’s safety seriously—this can protect you from claims or negative reviews. Some insurance policies may even expect patch testing for high-risk clients.
- Client trust & reputation: Explaining the patch test to your client builds trust. They see you’re not just applying extensions — you’re prioritising their safety. As one lash-industry blog put it: “[Patch testing] will also help to instil trust and confidence in your clients.”
- Quality control and product-compatibility: If you are a manufacturer (like us) or using premium adhesives and lash supplies, you want to ensure your product performs as expected on a real person’s skin/lashes before full application. This step also helps identify subtle incompatibilities (e.g., adhesive fumes, tape, primer, eye pad contact) before the main service.
For these reasons, whether you’re supplying lash kits or providing lash services, embedding the patch test in your workflow is not optional—it’s best practice.
Overview of Industry Standards & Guidelines
While the lash industry may not have globally unified regulations (as rigid as surgical protocols), there are several widely accepted guidelines and professional training modules that emphasise patch testing. For example:
- The course module from a recognised lash training provider states: “It is recommended that the patch test is done at least 3 days in advance of the appointment… the human eye is an extremely sensitive area and a patch test is necessary to ensure your client’s safety.”
- Many reputable studios recommend patch testing for first-time clients, those using new adhesives, or clients with prior allergic history.
- Blogs for lash technicians emphasise patch testing, documentation of results, following manufacturer instructions, and educating clients about the process.
From a dermatologist’s general patch-test perspective (though not lash-specific), the Wikipedia entry outlines how patch tests detect delayed-type hypersensitivity reactions (type IV) over 2-4 days.
Given these sources, as a professional lash extension manufacturer and wholesaler, we advocate the following checklist which aligns with industry expectations:
- Patch testing before the first full service or when any product changes.
- Use the exact product (or combination) that will be used in the full application (adhesive, tape, pad, etc.).
- Minimum waiting period of 24-48 hours (some recommend up to 72 hours) to monitor for possible reactions.
- Document results: date, product lot, area tested, client response.
- Confirm client consent and educate them on the possibility of developing sensitivity later even if the initial test was clear.
- Keep in-house protocols updated in line with product changes, ingredient updates, and training best practices.
Adhering to these helps you deliver safe services, protect your clients, and showcase your expertise in the lash industry.
Two Main Methods of Patch Testing
In practice, lash professionals tend to favour one of two primary methods. Understanding both helps you choose the approach best suited to your studio, products, and client base.
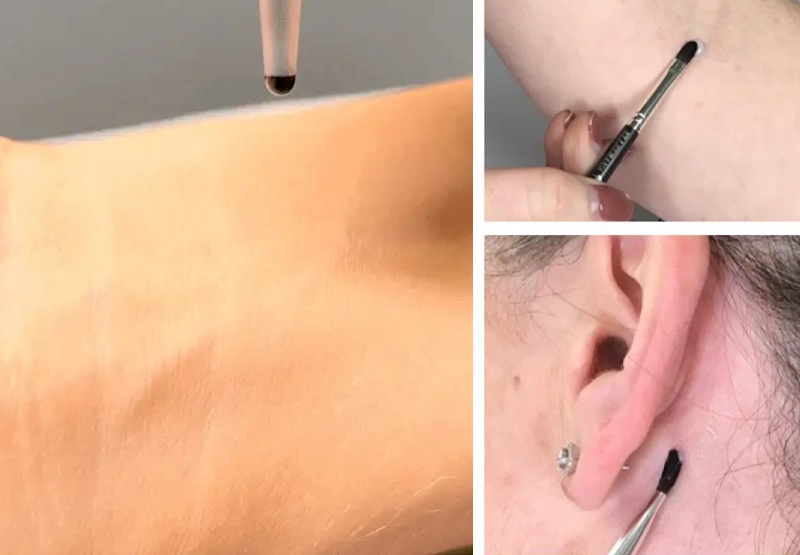
Method A: Small Skin Application (external surface)
In this method, a small amount of adhesive (or other product) is applied to a discreet area of the client’s skin — for example behind the ear, on the inner arm or wrist. The area is left untouched and monitored for 24-48 hours (or more) for signs of redness, itching, swelling or other irritation.
Pros:
- Very minimal lash equipment required.
- Non-invasive for the eye area.
- Fast setup.
Cons:
- Skin in that area may react differently than eyelid skin or lash line — meaning false negatives are possible. One expert notes: “Testing on the skin … is the old school method … a patch test in another area would likely provide a false-negative result.”
- Doesn’t test the actual lash environment (tape, pad, adhesive on lashes) which is the true exposure.
Method B: Mini Lash Application (“real-world” testing)
This method involves applying a small number of the actual extensions (or at least the same adhesive system) to the client’s natural lashes, typically at the outer corner of the eye, and allowing the client to keep them on for 24-48 hours (or longer) to monitor for reactions. Some protocols suggest up to 10 extensions per eye or about 10-12 lashes total.
Pros:
- Much closer to actual service conditions (same adhesive, tape, pads, method).
- More reliable in revealing potential issues specific to lash application (eye area, fumes, adhesive curing).
- Strengthens your confidence (and the client’s) that you’re truly safe to proceed.
Cons:
- Requires minor lash application (which may need removal later).
- Still not 100% guarantee for major or delayed reactions.
- Slightly more time and effort than a simple skin-patch.
Choosing which method
As a manufacturer and wholesaler supplying lash salons, we recommend Method B whenever possible—especially for first-time clients, clients with a history of sensitivities/allergies, or when trying a new adhesive or product line. It signals a professional standard and reduces risk significantly. That said, Method A can be acceptable for returning clients with no history of reaction and when using the same trusted product line, but the limitations should be communicated.
By offering both methods (and explaining the “why” to the client), you show transparency and professionalism—building trust and reducing liability.
Step-by-Step: How to Perform a Lash Patch Test Properly
Here’s a detailed walkthrough of how we recommend conducting a patch test, reflecting both practical experience and industry guidelines. Use this as a checklist you can incorporate into your client intake process.
Step 1: Client Consultation & Intake
- Ask about their medical history, previous allergic reactions, current medications, any dermatitis or eye conditions (blepharitis, dry eye, recent surgery). Reliable sources note that sensitivity may change over time.
- Advise the client what a patch test entails: the purpose, the waiting period, how to monitor, and what will happen if there is a reaction. Clear communication builds trust.
- Obtain signed consent for the patch test and for the full service, clarifying that even a negative test doesn’t 100% guarantee no future reaction.
Step 2: Preparation of the Test Area
- For skin-method: choose a discreet spot (e.g., behind the ear, inner arm) where there’s no broken skin, no sunburn, and preferably no heavy moisturisers or makeup. Clean the area with a mild cleanser and pat dry.
- For lash-method: cleanse the natural lashes and surrounding area thoroughly (removing makeup, oil, debris), apply under-eye pads and tape as you would for a full set, isolate the outer corner lashes. Cleanliness matters because residue or oil can alter adhesive performance.
Step 3: Application of Test Material
- Skin-method: Using a cotton swab or micro‐brush dipped into the adhesive (or other product you are testing), apply a small amount to the test area. Let it dry fully. Do not apply thick layers or cover with heavy tape that might interfere.
- Lash-method: With tweezers, pick a small number of natural lashes (e.g., 5-10 per eye) and apply lash extensions using the same adhesive you will use in the full set. Make sure the length/style is subtle so it doesn’t matter cosmetically. Apply as you normally would (primer, adhesive, extension). Document the product, lot number, adhesive brand, etc.
Step 4: Waiting Period & Monitoring
- Explain to the client that the test area must remain undisturbed for at least 24 hours, ideally 48 hours or up to 72 hours if possible. Some clinicians recommend waiting up to 3 days depending on risk.
- Instruct the client: Avoid rubbing, wetting, or applying other products on the test area.
- Ask the client to monitor for signs of reaction: redness, itching, swelling, burning, watery eyes (if lash method), hives or rash near the area.
- Encourage the client to report immediately if any discomfort occurs.
Step 5: Evaluation and Decision
- After the waiting period, examine the test area or lashes. If there is no sign of reaction, you can proceed with the full lash extension service.
- If there is a reaction—however mild (e.g., slight redness or irritation)—stop and remove the test application, document the reaction, and discuss options with the client. You may choose an alternative adhesive, carry out further testing, or recommend postponing.
- Document the outcome in the client file (date, products used, test site, results). This is a mark of professionalism and builds trust with the client.
Step 6: Communicate and Proceed
- If the patch test is clear, reassure the client and schedule the full set, reiterating after-care instructions.
- Remind them that even though the test was negative, sensitivity can still develop later—so they must monitor for any changes (especially with new products, illnesses, medications, or extensive lash wear).
- If the test was positive, provide clear next steps: alternative products, removal if needed, or consult with an eye-care professional if reaction is severe.
By following these steps, you deliver a safe, client-centered service, and you reinforce your position as a professional lash artist who uses manufacturer-recommended protocols and prioritises client safety.
What to Do If a Client Has an Adverse Reaction
Even when you follow patch-testing protocols and use high-quality products, sometimes a reaction will occur. Your ability to respond calmly, professionally, and effectively is what distinguishes an excellent lash studio from the rest.
Immediate Steps:
- Stop the procedure: If the reaction happens during the patch test or, worse, during application of the full set, cease work immediately.
- Remove any problematic material: With lash extensions, remove the applied lashes and adhesive using a safe adhesive remover (following manufacturer instructions). Avoid forcing or tugging.
- Provide first-aid relief: Gently cleanse the area with a mild, oil-free cleanser, apply a cool compress to relieve swelling/itching. Do not apply unknown creams unless approved by a medical professional.
- Advise medical consultation: If the reaction is moderate to severe (significant swelling, spreading redness, pain, fluid discharge), advise the client to see a dermatologist or ophthalmologist.
- Document the incident: Record what product/lot was used, how much adhesive, when the reaction occurred, what symptoms. This information is invaluable for future reference—and for product accountability if needed.
- Follow up: Check in with the client a day or two after the incident. This shows care and professionalism, and helps you maintain the client relationship.
Preventive Follow-Up:
- Investigate whether the reaction was due to the adhesive, tape, eye-pads, primer, or even after-care products. As noted, sometimes it’s not the adhesive but accessories or skin prep that cause sensitivity.
- Consider switching to a milder adhesive or hypo-allergenic product line—especially for this client or similar clients with sensitivity. For example, some brands highlight low-fume formulas for sensitive eyes.
- Re-inforce to the client the importance of gentle after-care and monitoring. Discontinue use of products that might aggravate the situation (oil-based removers, heavy eye-creams near lash line, etc.).
- Educate your team and update product logs to ensure you’re not applying the same product lot to multiple high-risk clients without awareness.
Remember: A reaction doesn’t necessarily mean the client can never have lash extensions—it means we must adjust and show even more care. Your reaction to the incident (professional, reassuring, solution-oriented) will matter more for your client’s loyalty and trust than the incident itself.
Common Causes of Allergic Reactions in Lash Extensions
Understanding why reactions occur helps you prevent them and explain the risks to your clients. From our vantage point as a manufacturer and working with lash studios globally, these are the most frequent triggers:
- Cyanoacrylate: This is the core bonding agent in many lash adhesives. It cures (sets) quickly, but some formulations release vapours during bonding which can irritate or sensitize skin and eyelids.
- Carbon black dye: Black adhesives often contain carbon black pigment, which in some cases can trigger sensitivity. Some salons choose clear adhesives for sensitive-eye clients.
- Tape, under-eye pads, primers, cleansers: These are often overlooked. The lash adhesive may pass patch test, but a new pad or primer may cause irritation. The patch test must consider all products used.
- Cumulative exposure over time: As noted earlier in the Reddit discussion, a client may tolerate lashes for years and suddenly develop a reaction. This is because sensitivity can build.
- Client health changes: Illness, hormonal shifts, medications (especially ones affecting skin/immune response), or conditions like dry eye, blepharitis, auto-immune issues can increase sensitivity. Studios like Deka Lash highlight this.
- Improper application or ventilation: Poor technique (too much adhesive, adhesive touching skin rather than lashes) or inadequate ventilation (fumes lingering) can increase risk of irritation.
- Adhesive storage/age: Adhesives that are old or improperly stored may off-gass more or bond inconsistenly, raising risk of reaction.
By being aware of these causes, you as a lash artist—or as the manufacturer supplying these studios—can proactively reduce risk: choose high-quality adhesives, provide updated training, ensure ventilation, and promote patch testing for all new clients or product changes.
Real-World Insights from Wholesalers & Clients
As a supplier of premium eyelash extensions and adhesives, we have direct feedback from both the wholesale-studio level and end-clients. These insights underscore the patch-test importance from both sides.
- Wholesale feedback: “We advise all our partner salons to make patch testing standard for new clients or when switching adhesives. When they skip it, we see more refund requests due to allergic reaction.”
- Studio feedback: A lash artist shared: “One of my regular clients switched to a new glue—no patch test done—and developed swelling overnight. We had to remove the set and offered a free removal. Since then I always make the patch test non-negotiable.”
- Client testimonials: An end-user reported: “I’ve had lashes for years and never reacted. But I changed salons and the glue brand changed. I woke up with itchy red eyelids. My new lash tech insisted on the patch test, and we found a different adhesive I tolerated fine—much better experience.”
- Trust building: Many clients specifically comment that they appreciate when a salon says, “We’ll test first to make sure you’re comfortable”—it makes them feel cared for, not just sold to.
- Manufacturer responsibility: We ourselves provide patch-test instructions with every adhesive batch and include documentation for salons to give to clients. The salons value this as part of their professional toolkit.
These real-world inputs reinforce the fact: patch testing isn’t just “nice to have”—it’s a mark of a mature, professional lash service. It benefits wholesalers (fewer returns), studios (fewer complaints, better reputation), and clients (safer experience).
Best Practices for Lash Artists to Incorporate Patch Testing
To turn this discussion into action, here are practical best practices you can build into your workflow:
- Set the patch test as part of the client-intake process: For first-time clients or returning clients after a hiatus or product change, clearly mark in your system “Patch test required before full set”.
- Use a dedicated form: Include fields for product name/lot, date of patch test, location of test, client consent, client understanding of the waiting period, and result.
- Charge (or include) a small fee: Some studios charge a minimal fee for patch testing (or waive it if the full set is booked). This emphasises that the patch test is a value-added safety measure—not a free add-on. One training provider suggested this.
- Educate the client: Explain in simple, reassuring terms: “We’re going to test a small number of lashes / apply a small amount of glue to check your skin’s reaction, because your safety and comfort come first.”
- Document results and store records: Keep a log of the patch test result and integrate it into your client profile (so next time you know what adhesive was used and what reaction, if any, occurred).
- Re-test when any variable changes: new adhesive brand, new tape/eye-pad product, client changes health status (pregnancy, medications, skin sensitivities), or client hasn’t had lashes for several months.
- Maintain high-quality product standards: Use adhesives from reputable manufacturers (like your own supply), ensure proper adherence to storage conditions, check expiration, train staff to avoid adhesive contact with skin.
- Follow after-care and monitor: Even after full application, ask clients to report any discomfort within 24-72 hrs, provide them with a checklist of what to watch (see section 14).
- Show your professionalism: Display signage or include in your price list: “Patch testing included for first-time clients / whenever we change adhesives”. This builds trust and differentiates you.
By embedding these best practices, you’ll enhance client safety, reduce operational risk, and position your studio as a premium, responsible choice.
Limitations and Realistic Expectations
While patch testing is a powerful tool, it’s important to set realistic expectations for yourself and your clients.
- Not 100% guarantee: As noted earlier, even a negative patch test doesn’t guarantee future reactions. Allergies can develop with repeated exposure, changes in health, or new product formulations.
- Limited exposure compared to full set: The small number of lashes or adhesive in a patch test is much less than what’s used in full application. A reaction may only appear under full exposure.
- Time and waiting period matters: Some reactions take longer than 24 hours to show; some training recommends up to 72 hours. If your client cannot wait this long, the test is less reliable.
- Different skin areas, different sensitivity: The outer corner lashes or skin behind ear may not exactly replicate the lash-line environment (tear film, lid movement, proximity to eyeball). So results may be imperfect.
- Other factors in play: Reaction may arise not just from adhesive but from tape, under-eye pads, primers, makeup residue, after-care products, or client behaviour (rubbing eyes, sleeping face-down). You must assess all variables.
- Client compliance needed: If the client doesn’t follow the waiting instructions (rubs the test area, uses moisturiser, gets it wet), the result may be compromised.
Communicate these limitations to your client honestly: “We’re doing everything we can to minimise risk, but no test is 100% foolproof.” Doing so builds trust and sets a mature professional tone.
When and How Often to Re-Test
Patch testing is not just a one-time action. Here’s when you should consider re-testing:
- New client: Always before first full set (if you haven’t done the patch test previously).
- New adhesive or product change: If you switch adhesive brand, type, tape/eye-pad or even glue lot, re-test.
- Client has had a long break: If they haven’t had extensions in several months (say maternity break, surgery recovery), their sensitivities may have changed.
- Client reports past discomfort: If a returning client mentions new irritation, dry‐eye, blepharitis, allergy history or medication change, run a patch test again.
- New health condition or medication: If the client’s health has changed (pregnancy, immuno-therapy, allergy diagnosis), it’s wise to re-test.
- Periodic check for high-risk clients: For clients with sensitive eyes, contact lens use, or history of mild reactions, you might adopt a “patch test every 6-12 months” policy.
By treating patch testing as part of your dynamic safety system—and not a one-off—you increase your resilience to risk and show your clients you truly care about their long-term comfort and well-being.
Building Professional Credibility and Differentiation
In a crowded lash-extension market, how do you stand out? Having a clear, systematic patch-test protocol does more than just protect you—it becomes a mark of professionalism.
- Market as a safety-first studio: Use bullet points like “We conduct a patch test for all new clients and product changes” in your website, brochure and intake form. Clients who value safety will be drawn to you.
- Educate clients about your process: When you communicate the “why” behind patch testing, you position yourself not just as a technician, but as an educated professional who cares. That builds rapport and loyalty.
- Use manufacturer backing: As a wholesale supplier, we advise that adhesives include patch-test instructions and documentation—provide these to your studio clients. Branding your supplies with “includes patch-test protocol” elevates your image.
- Protect your business: By documenting patch tests and outcomes, you create a defensible service record—useful for insurance, disputes, or client inquiries. It shows you’re proactive about risk.
- Enhance retention and referrals: Clients who feel safe, cared for, and listened to are more likely to return and recommend you. Sharing a quick story (“We found a minor sensitivity via the test and switched adhesive to keep you comfortable”) reinforces trust.
- Continuous professional development: Stay updated on new adhesives, fumes, peel-off products, and industry standards. When you can talk to clients confidently about ingredients and sensitivities, you raise your authority—and your bookings.
In short: Patch testing isn’t just a checkbox—it’s part of the premium service ecosystem that elevates your brand, supports your clients’ comfort, and secures your reputation.
Aftercare and Monitoring Post-Application
A patch test helps you proceed safely, but the work doesn’t stop when the full set is applied. Aftercare is equally important, especially for clients with sensitive eyes or first-time extension wearers.
Client Aftercare Tips
- Advise clients to avoid rubbing or tugging at the lash line (especially in the first 24-48 hours post-application).
- Use a gentle, oil-free lash cleanser daily (or every other day) to remove oils, makeup residue and environmental debris. This reduces the risk of buildup-induced irritation.
- Avoid heavy eye creams, oil-based makeup removers, or products that contact the lash-bond area.
- Sleep face-up if possible (or avoid face-down): mechanical pressure can irritate or disturb lashes, causing lash-bond breakdown and potentially exposing adhesive to the skin.
- Monitor for signs of irritation: persistent redness, itching, swelling, discomfort, eye discharge or undue lash loss. If any of these appear, remove the extensions promptly and consult.
- Book a check-in (e.g., 24-48 hours after the appointment) to observe retention and ensure client comfort.
- For some clients with known sensitivities, schedule shorter fill-intervals (e.g., 2-3 weeks) and consider lower-fume adhesives or alternative products.
When to React
If you or the client notice any of the following after full set application, action is needed:
- Swelling or redness extending beyond the lash-line.
- Itching or burning sensation that doesn’t ease within a few hours to a day.
- Watery or irritated eyes that weren’t present before.
- Large clumps of lashes falling, or lashes turning brittle (which may indicate adhesive breakdown).
- Client visibly uncomfortable, touching the area frequently, or telling you they feel “off”.
When this happens: remove the extensions, cleanse gently, apply cool compress, advise client to avoid makeup/irritants, and if symptoms persist, refer to medical professional.
By coupling patch testing with strong aftercare and monitoring, you prepare a full safety & quality loop—not just a one-and-done procedure.
Conclusion & Key Takeaways
In our role as a manufacturer, wholesaler and trusted partner to lash artists worldwide, we’ve seen how a robust patch-test protocol adds value—both in preventing problems and building client trust. Let’s summarise the key points:
- A patch test for eyelash extensions is a small preliminary test to check whether the client’s skin/eyes might react to your adhesive, extensions or related products before you apply a full set.
- It matters because the eye area is highly sensitive, allergens or irritants exist in lash-adhesives (and accessories), and sensitivities can develop over time even in clients who have had lashes before.
- Two primary methods exist: (A) small skin surface test, and (B) mini lash application test. Method B is more realistic but both are useful.
- Proper execution involves: client intake, cleaning the test area, applying the product, waiting 24-48+ hours, monitoring results, and documenting everything.
- If a reaction occurs, stop service, remove product safely, support the client, document, and possibly switch to gentler products.
- Patch testing doesn’t guarantee zero reaction — it mitigates risk and shows professionalism. You still need to monitor after-care and client comfort.
- Best practice: embed patch testing into your workflow, educate clients, document results, re-test when variables change, and use it as a professional differentiator.
- Aftercare and monitoring post-full set are just as important as the patch test itself: enquiring about retention, comfort and any signs of irritation keeps the client happy and healthy.
As the lash industry grows and client expectations rise, the studios and brands that take safety, professionalism and education seriously will stand out. By adopting a transparent, effective patch-testing policy, you essentially say: “Your eyes matter to us—not just the lashes.” That message builds loyalty, trust and a reputation for excellence.
FAQs
How long do I have to wait to see if the patch test result is valid?
Ideally 24–48 hours minimum. Many professionals recommend up to 72 hours if possible because some reactions are delayed.
Q2: If the patch test is negative, does that mean the client will never have an allergic reaction?
A2: No — a negative patch test reduces risk but doesn’t eliminate it. Sensitivities can develop later due to changes in health, medications, product lots, or cumulative exposure.
What if the client refuses to do a patch test?
As a lash professional you should educate the client on the benefits and risks. You may make the patch test mandatory for first-time clients or new adhesives. If they still refuse, you may decide to decline service or proceed with documented consent and increased caution.
Can I use any area of the body for the skin-patch test, like the wrist or ankle?
While some salons use the inner arm or wrist, many experts caution that skin there behaves differently than the delicate eyelid/lash line skin. A mini-lash application may give more accurate insight.
Is patch testing only necessary for first-time clients?
Not at all. It’s strongly recommended when you switch adhesives, use new products (pads, tape, primer), when a client has had a long break, or reports new allergies or medical changes. So it’s ongoing, not just a one-time initiation.
What should I document when I perform a patch test?
You should record: client name, date of test, location of test (skin or lash area), product/adhesive used (brand, lot number if available), which method was used, waiting period, and the result (no reaction or reaction found). Keep this in the client record for transparency and accountability.