![]()
Before applying for lash extensions, you have to make a plan to route lash extensions, to know where to locate lash extensions, and what lengths are needed, so the lash map is basically important.
Here is the complete guide about the lash map, and you can get to know everything basically important about the lash map.
Let’s dive into this topic.
What Is A Lash Map?
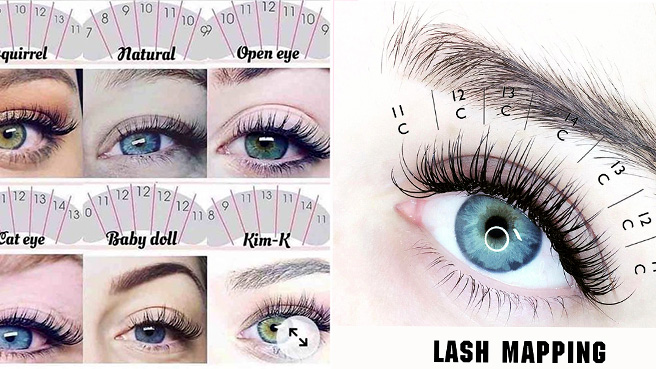
The lash map also named lash mapping, lash extension mapping, and eyelash mapping, can allow you to determine what lengths of lash extension you should use on which part of the lash line.
The silimar thing is like that, the map can tell where you need to go if you get lost. Yes, the lash map can tell you how to locate your lash extensions, and what lengths are needed for this location. And the lash map can help you design a look at what your lash extensions will show after applying for the lash extensions.
The lash map is the basically important guide to doing lash extensions for your clients, and you need to keep practicing until you get skillful. The lash map looks instinctive and simple, any style of lash extensions can be achieved following the lash mapping.
How to Read Lash Map?
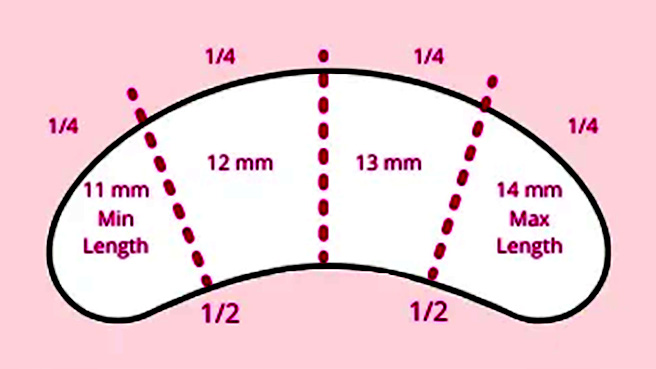
It is pretty easy to read a lash map, to know the lengths of lash extensions needed for this set of lashes. You can see the numbers on the lash mapping, and the number means the length of the lash extension.
And you can see the segments marked on the lash map, and numbers are written right inside each segment, starting from the inner corner and finishing at the outer corner. Please recognize the left eye and right eye, don’t be confused about the direction.
The lash mapping shows the look, while your client is closing eyes, and then you need to do lash extensions by following the lash mapping, to determine what lengths of the lash extensions you need to use to create the lash style.
Lash Map Advantages
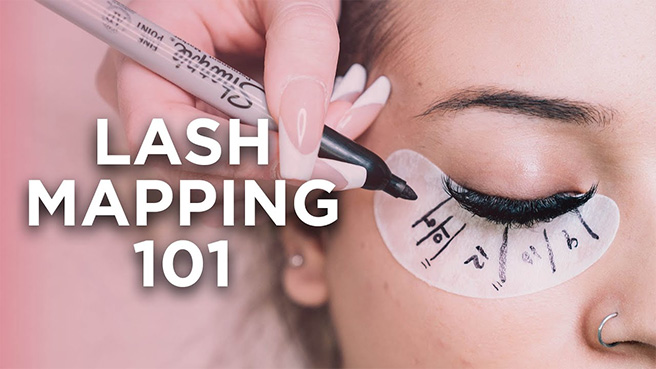
Mapping lash extensions for your clients is basically important, it is a must, and no matter how experienced you are in this field, you need to map the lash styling ahead of the process. So please be serious about the lash mapping.
Here are some advantages of lash mapping.
Keep things clear:
You can be clear about what lengths of lash trays you need if you have the lash map for reference. The lash map is helpful for the lash artist to know how to do lash extensions for clients.
Design lashing style:
The lash map can help you design the lashing style, to plan the lash extension route. You can draft various lengths, lash styles, looks, thicknesses for your clients ahead of time. And you can also create many advanced and experienced lash styles, to customize the unique look for your clients.
Save time:
It usually takes 2-3 hours even more time to finish the lash extensions and lash mapping can help you save time, and you only need to follow the lash map to work out the lash extensions, without overthinking during the process.
Create the right look:
The lash map can help you create the proper lashing style, without looking odd. It is the right tool for you to design a good-looking eye shape, without any complicated considerations.
Select the right length:
A comprehensive lash map can help you select the lash extensions with the right lengths, it can guide you to locate the lashes in the right place in the lash line.
Prevent mistakes:
The lash map can help you keep practicing, you can draw the last mapping on the plastic model to repeat again and again until you can grow to be skilled to gain more experience. And the lash mapping can prevent mistakes during the process, and please don’t throw away the lash mapping if you are the lash artist.
How to Map Lash Extensions?
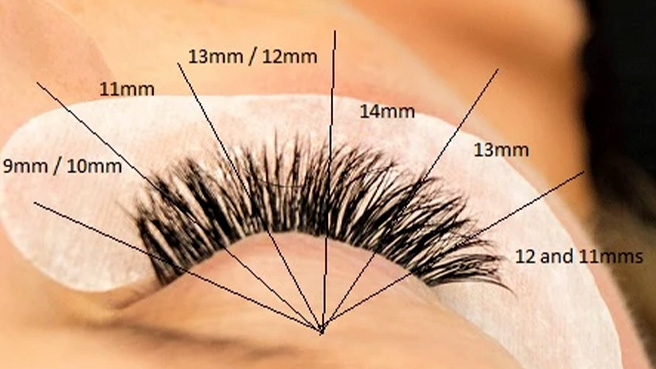
When your client lays down on the lash bed and closes her eyes, you can map the lash extensions to create a lash mapping. So how?
Things needed:
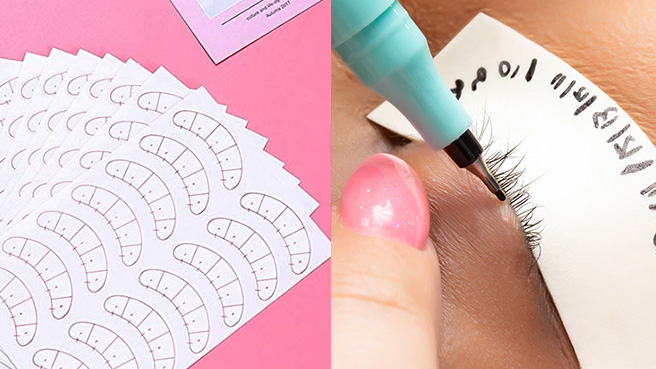
Some tools for your lash extension kit
- Gel pads for lash map: You need the gel pad to place under the natural lashes when your client closes her eyes.
- Colored pen: You can use a colored pen, red pen, blue pen, or green pen, any visible colors can contrast with eyelashes. You’d better choose the lash mapping pen to ensure precision and symmetry, also ensure that both eyes can always look flawless.
- Lash extensions: Here you can prepare the lash trays, with different lengths, thicknesses, curls for your selection during the working process.
Map the lash extensions
Lash extension mapping is the art of strategically planning the placement of lash extensions to achieve a desired look and enhance the client’s natural eye shape. Here’s a deeper dive into the process:
Step 1. Consultation and Assessment:
Client Consultation:
- Gather Information: Begin with a thorough consultation to understand the client’s lifestyle, desired look, and any allergies or sensitivities.
- Discuss Expectations: Discuss their expectations for the lash extensions. Do they want a natural look, a dramatic effect, or something in between?
- Eye Shape Analysis: Carefully analyze the client’s eye shape. Is it round, almond, hooded, close-set, or wide-set? Understanding the eye shape is crucial for selecting the most flattering lash map.
- Natural Lash Condition: Assess the health and condition of the client’s natural lashes. This will help determine the appropriate lash lengths, thicknesses, and curls to avoid overloading the natural lashes.
Step 2. Choosing a Lash Map:
Select a Base Map: Based on the client’s eye shape, desired look, and consultation, choose a base lash map. Popular options include:
- Doll Eye: Longest lashes in the center, tapering towards the corners.
- Cat Eye: Shorter lashes at the inner corner, gradually increasing in length towards the outer corner.
- Natural: Consistent lengths throughout with subtle variations.
- Squirrel: Short lashes at the corners, longest in the center, slightly longer at the outer corner.
- Wispy: Mix of lengths and curls for a feathery effect.
- Customize the Map: Tailor the base map to the individual client.
Consider Eye Shape: Adjust the map to compensate for any specific eye shape characteristics (e.g., hooded eyes, downturned eyes).
Address Client Concerns: Address any concerns or requests from the client. For example, if they want to minimize the appearance of close-set eyes, you might adjust the lash map to emphasize the outer corners.
Desired Effect: Fine-tune the map to achieve the desired level of drama. For a more subtle look, you might use shorter lengths and fewer lashes. For a more dramatic look, you might use longer lengths and more volume.
Step 3. Marking the Lash Line:
Use a Mapping Tool: Use a fine-tipped pen or pencil to lightly mark key points along the lash line.
- Inner Corner: Mark the starting point of the lash line.
- Outer Corner: Mark the endpoint of the lash line.
- Center Point: Mark the center of the eye.
- Length Increments: Mark points along the lash line to indicate where the lash lengths will increase or decrease. These marks serve as a visual guide during the application process.
Step 4. Determining Lash Lengths:
Select Lash Trays: Choose trays of lash extensions in various lengths, curls, and thicknesses.
Place Test Lashes: Place test lashes of different lengths along the marked points on the lash line. This allows you to visualize the desired effect and make adjustments as needed.
Adjust and Refine:
- Adjust the lengths and placement of the test lashes until you achieve the desired look and symmetry.
- Consider factors like the client’s natural lash length, desired fullness, and overall desired effect.
Step 5. Create a Visual Guide:
- Document the Map: Take a photo of the marked lash line with the test lashes in place. This creates a visual guide for application, ensuring consistency throughout the process.
Step 6. Apply Extensions:
- Follow the Lash Map: Carefully apply lash extensions according to the mapped design.
- Maintain Symmetry: Continuously check for symmetry between the left and right eyes throughout the application process.
Key Considerations:
- Eye Safety: Always prioritize eye safety. Use high-quality products and maintain proper hygiene.
- Client Comfort: Ensure the client is comfortable throughout the entire process.
- Continuous Learning: Stay updated on the latest lashing techniques and trends to enhance your skills.
By following these steps and continuously refining your technique, you can master the art of lash extension mapping and create stunning, customized sets for your clients.
A simple lash map is created using this guide, and you can create many other unique and special looks for your clients. Drawing lash mapping is an interesting thing you can keep practicing again and again, to get more experience during this lash mapping process.
Lash Extension Mapping Styles
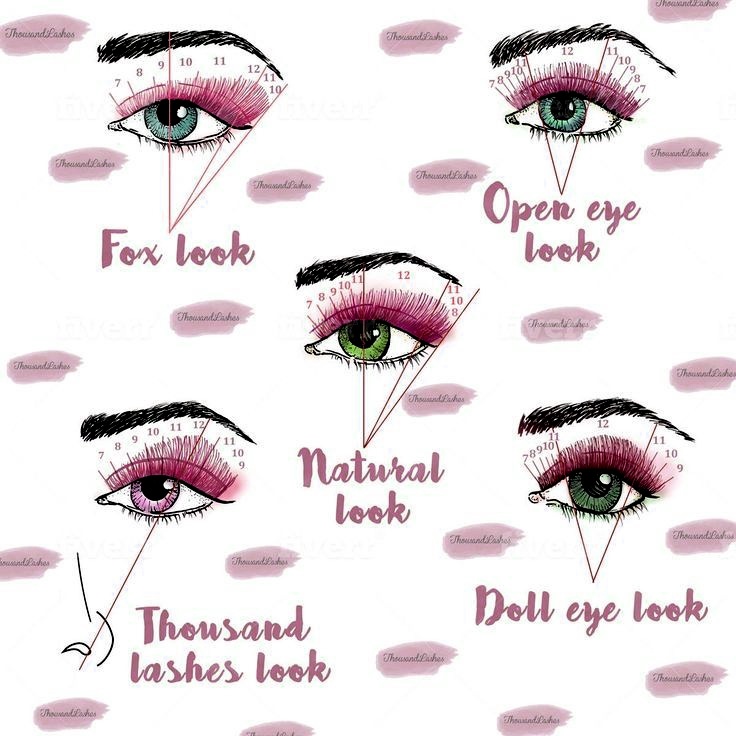
1. Doll Eye Lash Extension Styles
The Doll Eye lash map is characterized by its dramatic center focus. The longest lashes are applied directly above the pupil, creating a wide-eyed, doll-like effect. Lengths gradually decrease towards the inner and outer corners, resulting in a subtle wing.
- Ideal for: Clients with wide-set eyes, those who desire a youthful and innocent look, and individuals who want to emphasize the center of their eyes.
- Benefits:
- Opens up the eyes, making them appear larger.
- Can help correct the appearance of downturned eyes.
- Creates a youthful and playful look.
- Considerations: May not be suitable for clients with very close-set eyes, as it can further emphasize the distance between the eyes.
2. Cat Eye Lash Extension Styles
The Cat Eye map mimics the winged eyeliner effect. Shorter lashes are applied to the inner corner, gradually increasing in length towards the outer corner. This creates an elongated, almond-shaped appearance.
- Ideal for: Clients with hooded eyes, close-set eyes, and those who prefer a dramatic, sultry look.
- Benefits:
- Makes the eyes appear longer and more almond-shaped.
- Can help correct the appearance of close-set eyes by drawing attention to the outer corners.
- Creates a glamorous and sophisticated look.
- Considerations: May not be suitable for clients with very wide-set eyes, as it can further emphasize the distance between the eyes.
3. Natural Lash Extension Styles
The Natural lash map aims to enhance the client’s natural lash line with subtle variations in length. Typically, lengths gradually increase from the inner corner to the middle of the eye and then decrease slightly towards the outer corner.
- Ideal for: First-time clients, those with sensitive eyes, and individuals who prefer a low-maintenance, everyday look.
- Benefits:
- Creates a subtle enhancement that looks and feels natural.
- Minimizes the risk of discomfort or irritation.
- Easy to maintain and requires less frequent fills.
- Considerations: May not be suitable for clients who desire a more dramatic or glamorous look.
4. Squirrel Lash Extension Styles
The Squirrel lash map features a rounded shape, with the longest lashes applied in the center of the eye, similar to the Doll Eye. However, the outer corner also features slightly longer lashes compared to the inner corner, creating a more rounded, squirrel-like effect.
- Ideal for: Clients with round eyes, individuals who want to balance out the roundness of their eyes, and those who prefer a soft, feminine look.
- Benefits:
- Opens up the eyes and creates a more balanced appearance.
- Can help to soften the roundness of the eyes.
- Creates a soft and feminine look.
- Considerations: May not be suitable for clients with very close-set eyes, as it can further emphasize the distance between the eyes.
5. Wispy Lash Extension Styles
The Wispy lash map is characterized by its irregular and unpredictable pattern. It involves using a mix of lengths, curls, and sometimes even different thicknesses to create a feathery, airy effect.
- Ideal for: Clients who want a unique and artistic look, those who prefer a less structured and more bohemian style.
- Benefits:
- Adds volume and dimension to the lashes.
- Creates a unique and personalized look.
- Can be customized to suit individual preferences and styles.
- Considerations: May require more maintenance due to the irregular pattern. May not be suitable for clients who prefer a more structured or predictable look.
Here’s the table showing the different lash mapping styles:
| Lash Mapping Style | Description | Effect | Ideal for |
|---|---|---|---|
| Doll Eye Lash Extension Styles | Longest lashes in the center, tapering towards the corners | Wide-eyed, doll-like | Wide-set eyes, emphasizing the center of the eyes |
| Cat Eye Lash Extension Styles | Shorter lashes at the inner corner, gradually increasing in length towards the outer corner | Elongated, almond-shaped eyes | Hooded eyes, close-set eyes, dramatic look |
| Natural Lash Extension Styles | Consistent lengths throughout with subtle variations | Natural enhancement | First-time clients, sensitive eyes, low-maintenance look |
| Squirrel Lash Extension Styles | Short lashes at the corners, longest in the center, slightly longer at the outer corner | Rounded, balanced | Round eyes, balancing roundness |
| Wispy Lash Extension Styles | Mix of lengths and curls for a feathery effect | Unique, artistic | Those who want a personalized, less structured look |
Conclusion
Mastering the art of lash mapping is essential for any successful lash artist. By understanding different mapping styles, considering client preferences, and carefully planning each application, you can create stunning, customized lash sets that enhance natural beauty and exceed client expectations.
Ready to elevate your lash game?
Invest in high-quality lash extensions that will help you achieve flawless results. [Your Company Name] offers a wide selection of premium lash extensions in various lengths, curls, and thicknesses to suit every client’s needs.
Visit our website today and explore our wholesale options to discover the perfect lashes for your business.
