![]()
If you’re looking for beautifully curled lashes, knowing how to use an eyelash curler is a must. With the right technique, you can create a natural lift and stunning volume in seconds. This simple tool can transform your lashes, making your eyes appear wider and more defined. Ready to get the perfect curl? Quote your eyelash curler from Heyme Beauty today and experience the difference!
How to Use Eyelash Curler: Step By Step Guide
Step 1: Prepare Your Lashes
Before you curl your lashes, make sure they’re clean and free from any eye makeup. Gently remove any mascara or eyeliner with a makeup remover, so your curler doesn’t pick up any residue. It’s also important to make sure your lashes are completely dry.
Curling damp lashes or those with leftover mascara can cause your lashes to clump or break. Clean, dry lashes ensure you get the best results and prevent any damage.
Step 2: Curling Your Lashes
To get the best results, always choose a high-quality eyelash curler. While there are many brands out there, some are definitely better than others. Opt for a metal curler rather than a plastic or rubber one. Metal curlers tend to be sturdier and offer a much better grip, which helps curl your lashes more effectively. Plastic or rubber curlers don’t hold up as well and can break easily, making them less reliable.
Some cheaper metal curlers might feel flimsy and won’t last as long. Look for trusted brands like Shiseido, Shu Uemura, or Tarte for a durable, high-performance tool. No matter which brand you pick, make sure to clean your eyelash curler before each use. Keeping it clean helps maintain the curl quality and prevents any buildup that could damage your lashes.
Step 3: Hold the eyelash curler up to your eye.
When you hold the eyelash curler up to your eye, it might feel cold at first, but don’t worry—you’ll get used to it. Some people suggest warming the curler with a hair dryer before use, but it’s better to skip this step. Heating the curler can cause it to get too hot, and the sensitive skin around your eyes could get burned or irritated.
There’s really no need to heat the curler. You can achieve the same great results without the risk of burning your skin. The curler works perfectly fine at room temperature, so save yourself the hassle and stick to the basics.
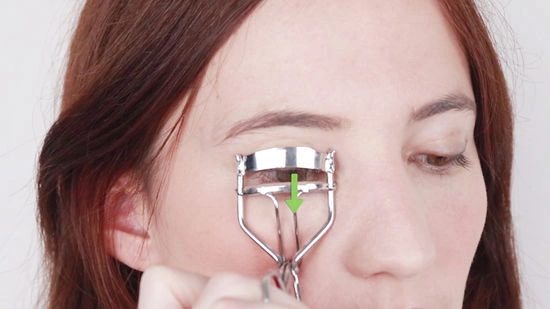
Step 4: Open the eyelash clamps.
Open the eyelash curler clamps and carefully position your lashes between them. Try to get as many lashes as possible between the clamps, making sure to reach the base of each lash for a nice, natural curl. Be careful not to get too close to your skin, or you might accidentally pinch yourself.
If you have thick or long lashes, you may need to curl them in sections. This helps ensure that every lash gets curled evenly and creates a more defined look. Taking your time with this step can help you get the best results without any hassle.
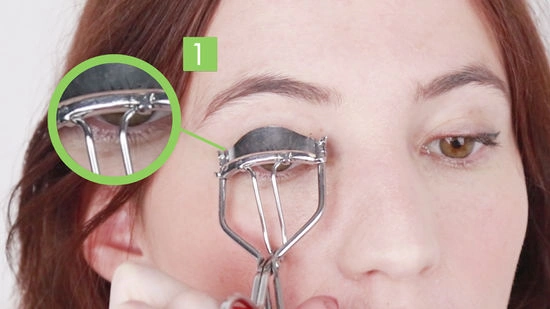
Step 5: Close the clamp on the eyelashes.
Gently close the eyelash curler on your lashes and hold it for about 3 seconds. Then, keep the curler closed for 20 to 30 seconds. If your lashes are very straight, you can hold it for up to 45 seconds or even a minute for a stronger curl.
Be careful not to squeeze your skin while doing this. Make sure the clamp is as close to the base of your lashes as possible for the best curl. This helps create a natural-looking lift from the roots, giving your lashes a fuller and more defined appearance.
Step 6: Curl your lashes in 3 sections.
To get the best curl, divide your lashes into three sections. This ensures every lash gets curled, making them look fuller and thicker. Start by curling the base of your lashes, being careful not to pinch the skin.
Moving on to the middle section of your lashes and curl them in the same way. Finish by curling the tips of your lashes for that perfect final touch. This step-by-step method helps create a more even and natural-looking curl.
Step 7: Make your lashe more fluffy
You don’t need to apply makeup to your lashes to achieve a natural look. By curling them, your lashes will appear a bit thicker and fuller, but still very natural.
This method helps create a fuller lash line without any makeup. It’s a great option if you have allergies or sensitivity to eye makeup, allowing you to enhance your lashes without irritation.
Step 8: Apply petroleum jelly to your eyelashes.
We’re going to use a little trick with petroleum jelly. First, make sure your eyelids and lashes are super clean. No flakes or anything! Then, grab a cotton swab and gently apply a thin layer of petroleum jelly right along your lash line. You can also rub a little between your fingers and dab it on the tips of your lashes. This gives them a shiny, healthy look.
Now, curl those lashes! Use your eyelash curler like you normally would. The petroleum jelly helps the curl hold and makes your lashes look longer and fuller. If you want even more lift, try a lash primer. It’s like a boost for your lashes, even if you skip the curler. You’ll get that wide-awake, dewy effect in no time!
Step 9: Apply mascara after curling.
Grab your eyelash curler and give your lashes a good curl. Then, it’s mascara time! Apply one or two coats, starting right at the base and wiggling the brush up to the tips. Give each coat a few seconds to dry. This layering trick makes your lashes look super thick and dramatic.
Don’t forget the bottom lashes! A cool trick is to hold a spoon under your lower lashes while you apply mascara. This stops the mascara from smudging on your skin. Want even more volume? Here’s a secret: baby powder! After your first coat of mascara, lightly dust some baby powder over your lashes. Apply another coat of mascara,done!
The powder clings to your lashes, making them look extra full. It’s a simple hack that really makes a difference. You’ll have those wow-factor lashes in no time!
Step 10: Try using a glittery mascara after curling for a dramatic effect.
It’s all about sparkle on top of your usual mascara. Curling those lashes! Get a good curl by working in sections: start at the base, then curl the middle, and finally curl the outer edges. Puting on a coat of your favorite black mascara. Let it dry completely. You need a good base for the glitter to stick to.
Grab your glitter mascara, like the one from E.L.F., and apply a coat over the black. One or two coats give you a subtle shimmer, perfect for a little sparkle. But if you want to go all out, don’t be afraid to layer up! Four or five coats will make your lashes super bright and flashy. It’s an easy way to add some serious glam to your look.
How to Use Eyelash Curler: Pro Tips
Use a heated eyelash curler for longer-lasting curls
A heated eyelash curler helps to set your curls, making them last longer throughout the day. The heat softens the lashes, allowing them to hold their shape better. Make sure to test the temperature before using it, as too much heat can damage the lashes. Gently squeeze the curler around your lashes, and hold for a few seconds to achieve long-lasting curls.
Curl lashes in sections for a more defined curl
To create a more natural and defined curl, divide your lashes into sections. Start at the base of your lashes and work your way up, curling in small sections at a time. This method ensures every lash is curled evenly and avoids creating an unnatural, overly curled effect. It also helps to reach every single lash, giving you a fuller and more voluminous look.
Don’t overuse the curler to prevent breakage
Using an eyelash curler too often can lead to lash breakage. It’s important to be gentle and avoid excessive squeezing or curling. Limit the use of your curler to once a day, and only curl your lashes when necessary. Overuse can weaken your lashes, causing them to fall out or break. Always use the curler with care to maintain healthy, strong lashes.
Conclusion
In conclusion, knowing how to use an eyelash curler can elevate your eye makeup routine. By gently clamping the curler at the base of your lashes and holding it for a few seconds, you can achieve beautifully curled lashes. Make sure to apply mascara afterward for added volume. For the best results, quote your eyelash curler from Heyme Beauty today, where quality meets precision in every product!
FAQ
How to Use Heated Eyelash Curler?
Turn on the heated eyelash curler and wait for it to heat up for a few seconds. You’ll often see a small light indicating when it’s ready to use. Hold the curler with the heated portion facing up and away from your eyes to avoid burns. Gently place the curler against your lashes, positioning it near the base.
Slowly clamp the curler down onto your lashes, holding it for 5-10 seconds. Move it along your lash line if you want to curl the whole lash. Afterward, check your lashes, and if needed, repeat for a more defined curl. Finish with mascara for extra hold.
How to Use Electric Eyelash Curler?
Power on the electric eyelash curler. Wait for it to reach the ideal temperature, which usually takes only a few seconds. Place the device at the base of your lashes, keeping the rubber or heated plate against the lashes.
Gently clamp and hold for 5-10 seconds. Move the curler in sections if necessary, working your way from the base to the tips of the lashes. After curling, apply mascara to set the curl and enhance the volume. Be cautious not to press too hard to avoid damage.
How Long to Use Eyelash Curler?
Hold the eyelash curler gently at the base of your lashes. Clamp down for no longer than 5-10 seconds. Be gentle, as pressing too hard could break the lashes. The goal is to achieve a curl, not to create tension that could damage the lash line.
You can repeat the curling process for more defined lashes, but avoid holding for too long to prevent potential breakage. Always check your lashes after curling to ensure the curl holds before applying mascara.
How to Use a Spoon to Curl Eyelashes?
Hold the spoon with the curved side facing upward and your lashes. Position the curved edge of the spoon against your eyelid, just below your lashes, ensuring it supports your lashes’ base.
Gently press your lashes against the spoon’s curve and hold for a few seconds. Move the spoon along your lash line if necessary. Once you’re happy with the curl, apply mascara to set the look and enhance volume.
How to Use an Eyelash Curler on Short Lashes?
Gently open the eyelash curler and position it near the base of your short lashes. Make sure to place it as close to the lash line as possible, being cautious not to pinch your eyelid.
Squeeze the curler gently and hold it for 5-10 seconds. Repeat this process for sections of your lashes, especially the middle and outer edges. Avoid pulling the curler too much, as it may cause breakage. Finish with mascara for added volume and length.
How to Use an Eyelash Curler Safely?
Ensure your eyelash curler is clean before use, as dirt or old mascara can cause damage. Place the curler at the base of your lashes and gently squeeze, keeping your eyes open. Avoid clamping too tightly to prevent breaking the lashes.
Hold for 5-10 seconds and release. Do not move the curler aggressively. Always inspect your lashes for any damage afterward. Using a quality curler with soft rubber pads will help protect your lashes and reduce the risk of injury.
How to Use an Eyelash Curler With Mascara?
Begin by curling your lashes before applying mascara. Hold the curler at the base of your lashes and gently clamp for 5-10 seconds. Do not curl after applying mascara to avoid clumping or pulling out your lashes.
After curling, apply a thin layer of mascara. Wait a few seconds for the mascara to dry, and then apply a second coat for added volume and length. Always use a gentle hand when applying mascara to avoid interfering with the curl.
How to Use an Eyelash Curler Without Breaking Lashes?
Always start with clean, dry lashes. Gently open the curler and position it at the base of your lashes. Clamp the curler softly, applying just enough pressure to create a curl. Avoid pulling or yanking on the lashes.
Hold the curler for no more than 5-10 seconds. Do not use excessive force, and don’t clamp too hard on short lashes. After curling, avoid tugging on your lashes while applying mascara to prevent breakage.
How to Use Compact Eyelash Curler?
Open the compact eyelash curler and position it close to the base of your lashes. Gently press the curler against your lashes, ensuring it fits your eye shape. Start at the base of the lashes for a more natural curl.
Hold the curler in place for 5-10 seconds, then gently release. The compact size allows for easy handling, especially for precise curling in hard-to-reach areas. Apply mascara to set the curl for lasting results.
How to Use Eyelash Curler and Mascara?
First, curl your lashes with an eyelash curler. Hold the curler at the base of your lashes and gently press for 5-10 seconds. Avoid clamping too tightly to prevent damage.
After curling, apply mascara by starting at the base of your lashes and wiggling the wand upward. Wait a few seconds for the mascara to dry before applying a second coat for added volume and length. This step sets the curl and enhances your lashes.
How to Use Eyelash Curler With Comb?
Curl your lashes first with the eyelash curler. Hold the curler at the base of your lashes for 5-10 seconds, making sure to curl the lashes in sections for more volume.
After curling, use a lash comb to gently separate any clumps in your lashes. Move the comb through the lashes from root to tip for a smooth and defined look. Finish with mascara for longer-lasting results.