

Most people don’t actually use a curved mascara wand the way it’s meant to be used.
They buy it expecting a dramatic lift, perhaps influenced by marketing images promises a lash-curler effect in a single swipe. Then, they apply it by swiping upward rapidly, just as they would with a standard straight brush. When their lashes look heavy, clumpy, or start dropping again by midday, they are left disappointed.
At that point, the blame is almost always placed on the mascara formula itself—”it’s too heavy,” “it has no holding power.” In reality, the culprit is usually not the product, but the technique.
A curved wand is built with specific geometry to do something fundamentally different than a straight wand. But if you ignore that design and use it like a straight one, you flatten the lashes and lose almost all of that intended mechanical advantage.
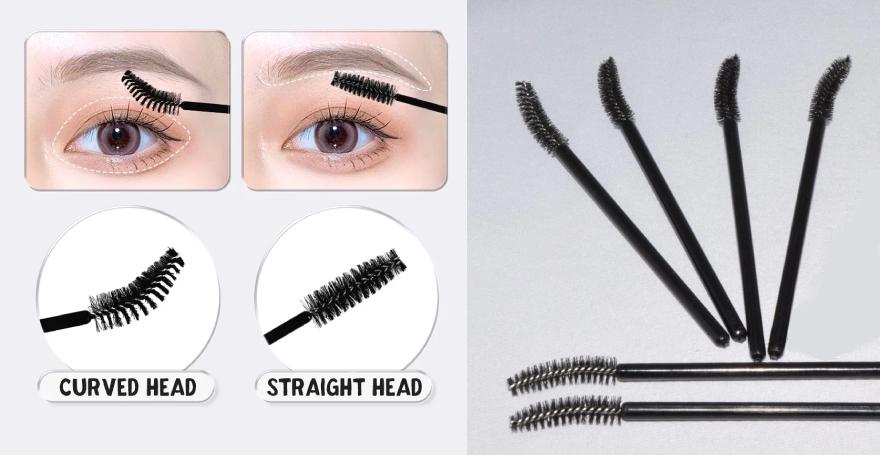
What a Curved Wand Is Really Doing
To understand how to use it, you first have to understand what it’s doing differently than the straight wand you are used to.
A straight wand mainly focuses on coating your lashes with formula; its primary job is to add product, build volume through stacking, and achieve some length. It relies entirely on the mascara formula to do the work of curling.
A curved wand works on a completely different principle. If you use it properly, the unique arc of the brush helps physically lift and sculpt your lashes from the root while you’re applying the mascara. It is not a separate step; the curling happens simultaneously with the coating.
That is the whole idea behind the engineering of the shape. If you look closely, the brush isn’t just bent randomly—it has two distinct working sides.
The inner curve (the side that dips inward, like a shallow bowl) is designed to grip closer to the lash line, cradling the roots for lift. The outer curve (the convex side) is designed to stretch, fan out, and separate the lashes as you move upward toward the tips.
Most people only use one side without realizing it, missing half the functionality. That’s why the result feels underwhelming.
Who Actually Benefits From It
While anyone can technically use a curved wand, it is not a “one-size-fits-all” tool. You will notice the single biggest difference if your lashes:
- Point straight out or, even more commonly, point slightly downward, making your eyes look less awake.
- Are resistant to holding a curl and lose their shape just a few hours after you apply a standard mascara.
- Often look fine at the tips—dark and long—but remain flat at the base, failing to create that wide-eyed open look. For these lash types, the curved wand acts as a structural mold. If your lashes are already very curled naturally, you won’t see a dramatic change in lift—but you will still benefit from the superior shaping and separation that the two-sided design offers.
Before You Start
Check your mascara tube first. Not all curved wands are the same size.
If the wand is wider than your eyelid, you will struggle to use it without smearing. That is not your fault. Some brands make curved wands that are simply too big for small or hooded eyes. Look for a shorter, more compact curve if you have this issue.
Also check the bristle type.
Plastic bristles (molded teeth) separate lashes more. They pick up less product per swipe. Good for a natural, defined look.
Fiber bristles (fluffy, hair-like) hold more product. They build volume faster. But they can also get clumpy if you do not wipe off the excess.
Keep a clean spoolie nearby. You will need it if you accidentally apply too much. A dry spoolie fixes clumps better than anything else.
One more thing. Do not pump the wand in and out of the tube. That pushes air in and dries out the mascara. Twist the wand slowly as you pull it out. That removes excess product naturally.
The Way to Use It (What Actually Works)
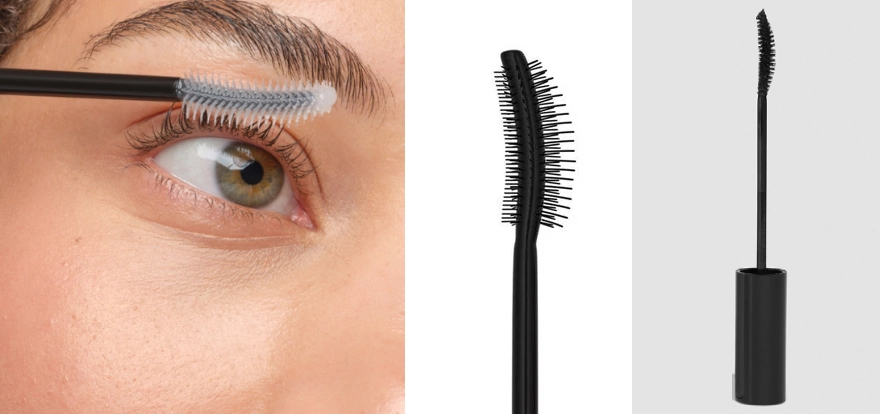
Start closer than you think
The most critical error occurs in the first second of application. Most people start applying halfway up the lash, which is already too late to create structural support. To get the benefit of the curve, you want the brush positioned right at the base of your lashes—almost touching your eyelid.
You need to maximize the surface area contact between the inner curve of the wand and the lash root. That foundational grip is where all the mechanical lift comes from.
Lock the root first
Before you even think about brushing upward, you need to pause for a consequential second right at the base. Place the inward curve against your lashes and perform a small, firm side-to-side wiggle. This is not an aggressive tug-of-war; it is a controlled movement just enough to work the product deeply into the roots.
If the base of the lash isn’t coated first to hold the weight of the formula, the weight on the tips will pull everything down later in the day.
That is the exact reason why lashes can look good for ten minutes right after application, and then slowly collapse.
Don’t pull straight up
This is the part almost everyone gets wrong. Your instinct is to pull the wand vertically. If you pull a curved wand straight up, you are basically tensioning and flattening the lashes against the brush as you go, canceling out the lift. Instead, you have to let the brush follow its own engineered shape.
As you move upward from root to tip, you must slightly roll your wrist so the wand moves along its own curve. Think of it less like brushing and more like a rolling rotation that guides the lash into the ‘C’ shape. It doesn’t have to be an exaggerated or clumsy rotation—just a small, subtle wrist rotation.
Once you get used to this dynamic motion, it feels completely natural. And the difference in the final curl is immediate.
Use the tip, not the whole brush
For the outer corner of your eye, which is often harder to reach and has shorter, differently angled lashes, do not try to use the full wand. Turn the brush slightly and use just the last few millimeters of the tip to pull lashes outward.
That outer corner extension is what truly opens up the eye shape and creates a “winged” effect. The same idea applies to the inner corner—but with an even lighter touch. Just tap the lashes with the tip; do not drag the brush.
These small, intricate areas are where most applications fall apart, but a few seconds of precision fixes it.
Lower lashes (keep it simple)
A curved wand is not really made for lower lashes; its geometry works against you down there. If you still insist on using it for convenience, flip to the outer curve (the convex side) and go very light. Just lightly touch the tips.
Pushing the inner curve into the lower lash line is a guaranteed recipe for smudging product on your skin. Otherwise, the reality is that a slim straight wand will always be easier to control and more precise here.
Where Things Usually Go Wrong
Most issues with a curved wand are not random; they stem from a few common habits.
Too much product
If the brush looks overloaded with mascara paste when it comes out of the tube, it is. A common mistake is digging more out. In fact, wiping off a bit of excess on the rim or a tissue usually gives you a far cleaner result. A thinner coat allows the lash to hold its shape better than a heavy, saturated coat.
No base support
If the roots are bare or barely coated because you started too high up, the lashes simply won’t hold their shape. You might get great length, but you will have zero lift—and no staying power.
Rushing the application
Mascara formulas, especially those designed for curling, start to set quickly. If you move too fast, the formula sets before you have finished the necessary shaping and rolling motion. Especially in dry or air-conditioned environments, it helps to slow down and work in smaller sections if needed.
Using a heavy formula on fine lashes
If you have fine, thin lashes, you must avoid wax-heavy volume mascaras. While they add thickness, their weight can cancel out the delicate lift a curved wand is trying to create. In that case, a lighter “length” or “lift” formula will almost always perform better and hold the curl longer.
Mascara Wands vs. Other Brush Heads
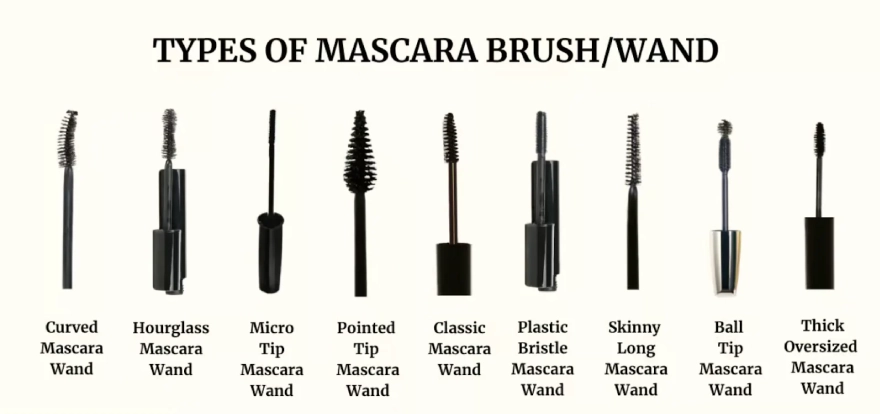
Curved Wand vs. Other Brush Shapes
Not everyone needs a curved wand. Here is how it compares to other common shapes. Use this to decide if curved is right for you.
Curved vs. Straight Wand
A straight wand coats lashes evenly. It is simple. It works for almost everyone. But it does not lift. If your lashes already point upward, a straight wand is fine. If your lashes point straight out or downward, a straight wand will not fix that. Curved wand adds lift. Straight wand does not.
Curved vs. Metal Wand
Metal wands have no bristles. They separate lashes completely. They also curl by pulling lashes upward against a cold steel rod. But they require more skill. You need to apply mascara first with a different wand, then use the metal wand to separate and curl. That is two steps.
A curved wand does both in one step. Metal wands are for people who want perfect separation. Curved wands are for people who want lift without extra steps.
Curved vs. Comb Wand
A comb wand has teeth instead of bristles. It separates lashes completely. Zero clumps. But it adds almost no volume. It is a specialty tool for people with lashes that stick together. A curved wand adds volume and lift while still separating. Comb wands are for separation only. Curved wands are for lift plus volume.
Curved vs. Skinny Wand
A skinny wand is narrow. It reaches every single lash. It is excellent for lower lashes and hooded eyes. But it does not lift. It coats. A skinny wand is for precision. A curved wand is for lift. If you have very short lashes, a skinny wand may work better. If your lashes are long but flat, a curved wand works better.
Quick Fixes That Actually Help
Clumps and smudges happen to everyone. When they do, you don’t need to panic and start over. Trying to fix wet mascara is what usually makes things worse, smearing it further.
- Clumps → Take a clean, dry spoolie brush and gently go through the lashes to break them apart.
- Lashes look flat → After wiping your wand clean (or using a clean curved wand), run it under your lashes and reshape the curl without adding any product. The dry wand will act as a sculpting tool.
- Smudges on eyelid → This is critical: let them dry completely first. Then, gently flick them off with a dry cotton swab. They will pop right off without smearing into your shadow.
Do You Still Need a Lash Curler?
This depends entirely on the level of impact you want. A curved wand is designed to give you a more natural, everyday lift—like your lashes just sit that way. A lash curler creates a stronger, more aggressive, and defined bend.
For everyday wear, the wand alone is often enough. For nights out, photos, or when you want maximum drama, using both together works best. Use the curler first to set the memory, and then use the curved wand to apply and “seal” that shape.
Why the Design Actually Matters
The curve is not just random; it’s rooted in how lashes grow. When these brushes are developed, the curve is usually based on how human lashes naturally sit and how the eyelid itself arches.
Even the material of the bristles makes a difference in performance: Softer, fiber-style bristles adapt better to the curve, “hugging” the lash during that essential wrist roll. Firmer silicone ones separate well but don’t “hug” or mold the lash the same way, requiring more technique.
That’s why two curved wands can feel completely different in use.
FAQ
Can I use a curved wand if I already use a lash curler?
Yes. Use the curler first to set the shape. Then use the curved wand to apply mascara. The wand will help seal the curl and prevent it from dropping.
Why do my lashes look good at first but drop after an hour?
Two reasons. Either you did not wiggle enough at the root, or your mascara formula is too heavy. Try a lighter formula designed for lift, not volume. Also make sure the roots are fully coated.
Can I use a curved wand on lower lashes?
You can, but it is not ideal. Flip the wand so the outer curve faces your lower lid. Use a very light touch. Or just keep a small straight wand for lower lashes.
How do I know if my curved wand is the right size for my eyes?
Hold the wand next to your eye. If it is wider than your eyelid, it is too big. Look for a shorter curved wand. Asian beauty brands often make smaller curved wands that fit smaller eye shapes better.
What is the difference between a curved wand and a bent wand?
A curved wand has a smooth, gradual arc. A bent wand has a sharp angle in the middle. Bent wands are usually cheaper and less effective. Look for a smooth curve, not a sharp bend.
Can left-handed people use a curved wand?
Yes. The curve works the same way. You may need to rotate your wrist in the opposite direction. Practice slowly in front of a mirror. After a few tries, it will feel natural.
How many coats should I apply?
Two thin coats are better than one thick coat. Apply the first coat with the inner curve facing your lid. Let it dry for 15-20 seconds. Apply the second coat with the same technique. Do not add a third coat. It will weigh down the lashes.
Why does my curved wand always have too much product on it?
You are pumping the wand. Stop doing that. Twist the wand slowly as you pull it out. If it still has too much, wipe it on the edge of the tube or on a tissue.
Conclusion
A curved mascara wand isn’t hard to use. But it’s very easy to use it like the wrong tool. Once you adjust just a couple of small things—mainly getting closer to the root and letting the brush follow its curve—you’ll see the difference quickly.
Your lashes won’t just look lifted and wide-eyed when you first finish. They’ll still look lifted hours later. And that’s really the entire point of using one.