

You can learn how to prepare a lash packaging dieline by following a clear process. You must measure your lash product, select the right software, and set up your file with accurate specifications.
You need to draw the dieline and export it in the correct format. Heyme Beauty helps you understand how to prepare a lash packaging dieline for Cluster Lashes Wholesale. You will see how to prepare a lash packaging dieline with attention to detail and technical accuracy.
You can rely on Heyme Beauty’s expertise to show you how to prepare a lash packaging dieline that meets packaging standards. You will succeed in preparing a lash packaging dieline when you focus on precision and use the right packaging tools.
Key Takeaways
- A dieline is a blueprint for packaging. It shows cut lines, fold lines, and glue areas. Use it to ensure your lash packaging fits perfectly.
- Include bleed and safe zones in your dieline. The bleed area prevents white edges after trimming. The safe zone keeps important details away from the edge.
- Choose the right software for creating dielines. Programs like Adobe Illustrator allow for precise designs and easy edits.
- Double-check your dieline for accuracy before production. Confirm measurements, logo placement, and structural features to avoid costly mistakes.
- Collaborate with your manufacturer. Share your dieline in vector format and ask for feedback to ensure compatibility with their production methods.
Dieline Basics for Lash Packaging
What Is a Dieline?
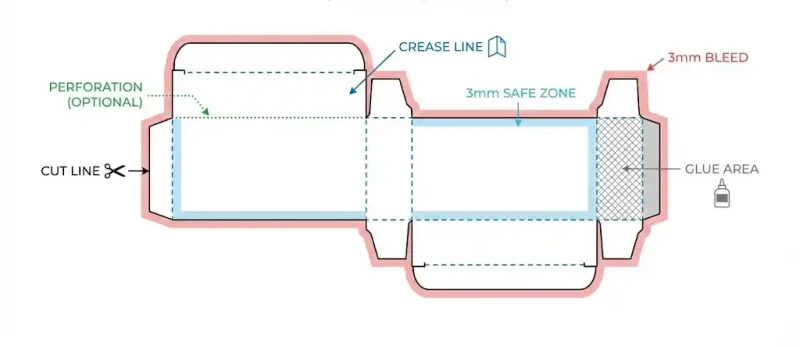
A dieline is a technical drawing that shows the exact shape, size, and layout of your packaging. You use a dieline as a blueprint for creating custom lash packaging, such as boxes for Cluster Lashes Wholesale. This drawing includes all the cut lines, fold lines, glue areas, and zones that guide the printing and assembly process.
At Heyme Beauty, you follow strict standards to make sure every dieline matches the product’s dimensions and material thickness. This accuracy helps your packaging protect the lashes and look professional on store shelves.
When you create a dieline, you must use industry-standard colors for each element. For example:
- Solid red or 100% magenta for cut lines
- Dashed blue or cyan for fold or score lines
- Dotted black or gray for perforations
- Light yellow or 20% magenta for glue areas
You also need to include three important zones in your dieline:
- Bleed area: Extends at least 3mm beyond the dieline to prevent white edges after trimming
- Trim lines: Show where the packaging will be cut
- Safe zone: Keeps logos and important details away from the edge, usually 3- 5 mm inside the trim line
Why Dielines Matter in Packaging?
You rely on a precise dieline to make sure your packaging fits your Cluster Lashes Wholesale perfectly. A well-made dieline prevents mistakes during printing and assembly. It also keeps your packaging strong and attractive. If you skip steps or use an inaccurate dieline, you may face several problems.
| Consequence | Description |
|---|---|
| Misalignment | Incorrect alignment of packaging components leading to aesthetic issues. |
| Inadequate protection | Packaging may not adequately protect the lashes during shipping and handling. |
| Increased production costs | Errors in the dieline can lead to rework, raising overall production expenses. |
You avoid these issues by following Heyme Beauty’s dieline standards. This attention to detail helps you deliver high-quality packaging that protects your lashes and supports your brand image.
Key Elements of Lash Dieline Packaging
When you design lash packaging for Cluster Lashes Wholesale, you must understand the essential parts of a dieline. Each element plays a role in making sure your packaging is both attractive and functional. You can follow Heyme Beauty’s standards to create a dieline that supports your brand and protects your product.
Cut and Fold Lines
You use cut and fold lines to show where the packaging material will be trimmed and bent. Solid lines mark the edges where you cut the material. Dotted or dashed lines show where you fold or score the packaging. This clear system helps manufacturers assemble each box correctly.
You can see the typical colors used for these lines in the table below:
| Line Type | Color Used |
|---|---|
| Cut Lines | Solid red or 100% magenta |
| Fold/Score Lines | Dashed blue or cyan |
You must include these lines in your dieline to avoid confusion during production. This step ensures your packaging has the right shape and structure.
Bleed and Safe Zones
You need to add bleed and safe zones to your dieline. The bleed area extends at least 3mm beyond the dieline. This extra space prevents unwanted white edges after trimming. The safe zone sits inside the trim line, usually 3- 5 mm from the edge. You should keep all logos, text, and important graphics inside this area.
This practice protects your design from being cut off during manufacturing. You create a professional look for your lash packaging by following these guidelines.
Tip: Always double-check that your artwork fills the bleed area and that nothing important sits outside the safe zone.
Glue Tabs and Structural Features
You add glue tabs and structural features to your dieline to improve durability. Tray inserts keep lash bands flat and steady. Glue tabs help the packaging hold its shape inside display units and shipping cartons. You prevent bowing at the sides by using short, steady folds.
Sturdy materials and smart design choices keep your packaging strong during storage and handling. These features make sure your Cluster Lashes Wholesale arrive in perfect condition.
You can create a reliable dieline by focusing on these key elements. Each part works together to give your packaging a professional finish and protect your product.
How to Prepare a Lash Packaging Dieline: Step-by-Step
Creating packaging dielines for your lash products requires careful planning and attention to detail. You can follow these steps to ensure your lash packaging meets industry standards and showcases your brand, just like Heyme Beauty does for Cluster Lashes Wholesale.
Measure Your Lash Product
Start by measuring your lash product. Use a ruler or caliper to get the exact length, width, and height of your lash trays or cases. For Cluster Lashes Wholesale, you should also measure the thickness of the lash tray and any inserts. Record these measurements.
Accurate dimensions help you create a dieline that fits your product perfectly and prevents movement during shipping. Always double-check your numbers before moving to the next step.
Tip: Add a few millimeters to each side if you plan to include inserts, ribbons, or extra padding in your packaging design.
Choose Tools and Software
Select the right software for creating packaging dielines. Most professionals use vector-based programs because they allow for precise lines and easy editing. Here is a table of commonly used software:
| Software Program | Description |
|---|---|
| Adobe Illustrator | Considered a standard in the packaging and printing industry. |
| Esko Studio/ArtiosCAD | Ideal for complex packaging or 3D modeling designs. |
| CoreIDraw | Highly used in the signage/label industry. |
You can use Adobe Illustrator for most lash packaging dieline projects. If you need advanced 3D modeling or structural design, Esko Studio or ArtiosCAD works well. Heyme Beauty often uses these programs to create custom dieline templates for Cluster Lashes Wholesale and other products.
Set Up File Specifications
Set up your file with the correct specifications before you start drawing. This step ensures your dieline packaging will be ready for manufacturing. Use a new document with the following settings:
- Color Mode: CMYK (for print accuracy)
- Resolution: 300 DPI (dots per inch)
- File Size: Match your measured dimensions, plus bleed area (usually 3mm on each side)
- File Format: Save as AI, PDF, or EPS for vector files
You should also consider the material and finishing options for your packaging. Here are some common choices:
| Category | Details |
|---|---|
| Material | SBS (C1S, C2S), Uncoated Stock, Textured Stock, Kraft, Metalized Card (Silver, Gold, Holographic) |
| Material Thickness | 12pt, 14pt, 18pt, 24pt, Custom; Corrugated Stock: 3-ply |
| Finishing Types | Gloss, Matte, Sandy Matte, Soft Touch, Pattern, Spot UV, Foil Stamping, Embossing, Debossing |
| Features | Window Cutouts, Ribbons, Handles, Hang Tab, Custom Perforation, Scoring, Gluing |
Choose the options that best fit your brand and product needs. Heyme Beauty offers a wide range of materials and finishes for custom lash packaging, so you can create a unique look for your Cluster Lashes Wholesale.
Draw and Export the Dieline
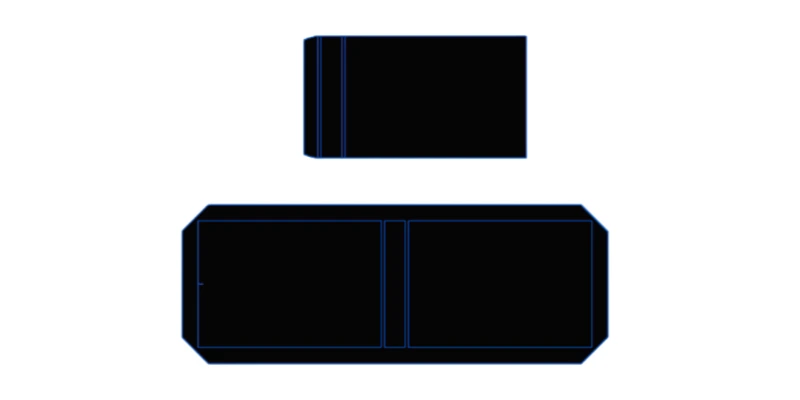
Begin drawing your dieline template using your chosen software. Use vector lines to mark cut lines, fold lines, glue tabs, and structural features. Keep all important design elements inside the safe zone and extend backgrounds into the bleed area. Label each part of the dieline clearly.
You can use color codes for different lines, such as red for cuts and blue for folds.
When you finish your dieline packaging design, review it for accuracy. Make sure all measurements match your product and that the dieline template includes every necessary detail. Export your file in a vector format (AI, PDF, or EPS) with CMYK color mode and 300 DPI resolution. This ensures your manufacturer can use your dieline without any issues.
Note: Heyme Beauty provides dieline templates and custom packaging solutions. You can request a dieline template for Cluster Lashes Wholesale to speed up your design process and ensure compatibility with their manufacturing standards.
By following these steps, you can create professional, manufacturing-ready packaging dielines for your lash products. This process helps you avoid costly mistakes and ensures your packaging design stands out in the beauty market.
Dieline Packaging Optimization & Common Mistakes
Avoiding Errors in Dieline Creation
You can avoid costly mistakes by checking your dieline before sending it to production. Many designers make errors that affect the quality of lash packaging. You should watch for these common issues:
- Overly complicated or cluttered designs can make your packaging look unprofessional.
- Forgetting the inner tray may lead to damage during shipping.
- Ignoring shipping durability can result in a poor first impression for your customers.
- Using low-resolution graphics often leads to blurry print on your packaging.
You need to keep your dieline simple and clear. Always include every structural feature, such as trays and glue tabs. Choose high-resolution graphics to ensure sharp printing. You should also test your packaging for strength and durability.
Heyme Beauty recommends reviewing each dieline for these mistakes to maintain high standards.
Tips for Manufacturing-Ready Dielines
You can optimize your dieline for manufacturing by following a few key steps. Proofing your dieline helps you catch errors early. Check that all fold lines align perfectly with the template.
Misaligned folds can cause problems during assembly. You should use manufacturer-provided dieline templates whenever possible. These templates match production methods and reduce the risk of errors.
Tip: Always ask your manufacturer for feedback on your dieline. Their advice helps you meet production requirements and avoid delays.
You should check seams and folds for accuracy. Make sure glue tabs are in the right place. Review the safe zone and bleed area to protect your design. Heyme Beauty’s production standards require you to double-check every detail.
This process ensures your packaging is ready for mass production and protects your Cluster Lashes Wholesale.
| Optimization Step | Benefit |
|---|---|
| Proof dieline template | Catches errors before production |
| Align fold lines | Prevents misalignment during assembly |
| Use manufacturer templates | Ensures compatibility |
| Review structural features | Improves packaging durability |
You can create reliable packaging by following these tips. Your dieline will help your product stand out and arrive safely to your customers.
Production Checklist for Lash Dieline Packaging

Final Review Steps
You need to check your dieline before sending it to production. Start by confirming that your packaging matches the measurements of your lash trays and inserts. Make sure you use one SKU structure for curl, length, and diameter across every tray, box, and carton. This step keeps your packaging consistent and easy to track.
Review your logo placement. Use a three-level hierarchy: a small icon mark, a wordmark on the front, and your legal entity on the back or side. Lock your print-safe files by embedding fonts and using vector logos.
Check that your dieline includes all cut lines, fold lines, glue tabs, and structural features. Reserve a compliance zone on the back panel so legal text does not crowd your design.
Tip: Add traceability fields like lot number and production date early. This helps you track batches and improves quality control.
Here is a simple checklist you can follow:
- Confirm product measurements and SKU structure
- Review logo hierarchy and placement
- Lock print-safe files (vector logos, embedded fonts, correct dielines)
- Reserve compliance zone for legal text
- Add traceability fields (lot/batch, production date)
- Check bleed and safe zones
- Verify glue tabs and structural features
Manufacturer Compliance
You must work closely with your manufacturer to ensure your dieline meets their requirements. Share your packaging files in vector format and confirm the color mode is CMYK. Ask your manufacturer to review your dieline for compatibility with their machines and materials.
Double-check that all folds, seams, and glue tabs align with their templates.
Use Heyme Beauty’s workflow as a guide. Collaborate with their team to proof your packaging and make adjustments if needed. This partnership helps you avoid errors and ensures your packaging is ready for mass production.
Note: Always communicate with your manufacturer about any special features or finishes. Clear instructions prevent misunderstandings and keep your packaging project on track.
You can achieve reliable results by following this checklist and working with your packaging partner. Your dieline will protect your lash products and support your brand’s reputation.
Conclusion
You can master lash packaging dieline preparation by following these steps:
- Confirm your dieline early with exact dimensions and clear fold lines.
- Lock tray size and plan finish details for your packaging.
- Prepare artwork files and barcode placement.
- Collaborate with your packaging partner for technical compliance.
- Review your dieline checklist before production.
Accurate dieline work reduces costs and ensures your packaging stands out. For custom solutions, Heyme Beauty supports you with expert guidance and resources for Cluster Lashes Wholesale.
FAQ
How do you choose the right material for lash packaging?
You select the material based on your product’s weight and desired look. Paperboard works well for lightweight lashes. Acrylic or magnetic boxes suit premium styles. Ask your manufacturer for samples to compare options.
What file format should you use for dieline packaging?
You should use vector formats like AI, PDF, or EPS. These formats keep lines sharp and allow easy editing. Manufacturers prefer these files for accuracy and compatibility.
Can you use Heyme Beauty’s dieline templates for custom packaging?
Yes! Heyme Beauty offers dieline templates for Cluster Lashes Wholesale and other products. You can request a template to speed up your design process and ensure your packaging meets production standards.
What is the safe zone in a dieline?
The safe zone is an area inside the trim line. You keep logos, text, and important graphics here. This protects your design from being cut off during manufacturing.
Tip: Always check that your artwork stays inside the safe zone for best results.
How do you avoid common mistakes in dieline creation?
You review your dieline for accuracy. Check all cut and fold lines. Use high-resolution graphics. Ask your manufacturer for feedback before production. This process helps you catch errors early.