![]()
In today’s beauty world, not every lash lover wants the commitment of salon appointments or the heavy feel of full-strip lashes. That’s exactly where lash clusters step in — and they’ve changed the game. Lightweight, customizable, and perfect for at-home glam, lash clusters let you build your dream look, one section at a time. Master the Lash Clusters Tutorial now. From subtleIf you’ve ever tugged at your lash line in frustration while removing falsies, you’re not alone. one section at a time. From subtle daytime elegance to dramatic night-out vibes, these mini lash segments give you the control that traditional extensions or falsies often lack.
Why Lash Clusters Are Changing the Lash Game
Now, let me speak from experience — not just as a lash enthusiast, but as a manufacturer deeply involved in the beauty and sleepwear industries. We’ve been behind the scenes, working with lash artists, cosmetic scientists, and even pajama designers (yes, because comfort matters during application too!). And here’s what we’ve learned: Cluster lashes empower users — they make you feel in control, creative, and polished.
But here’s the kicker — many people still don’t know how to apply them properly. They’ve tried tutorials that are either too technical or too vague, resulting in crooked lashes, clumpy glue, or worse, irritated eyes. That’s why we created this in-depth guide, packed with insider knowledge, real customer feedback, and best practices inspired by both industry standards and our own production expertise.
And just so you know, lash clusters aren’t just a TikTok trend. According to Wikipedia, false lashes — including cluster styles — have been evolving since the early 20th century. But what’s different now is how accessible and customizable they’ve become for everyday users. You no longer need a pro to get that lifted, voluminous effect.
In this tutorial, you’ll learn:
- Which tools are non-negotiable (and which ones are overhyped)
- A simple 7-step application method anyone can follow
- Real insight from interviews with big-brand lash sellers and e-commerce shop owners
- Safety practices backed by industry regulations like EU Cosmetic Safety Regulation and U.S. FDA guidance
Our goal? To help you apply lash clusters with confidence, ease, and a little bit of fun.
Tools You Absolutely Need Before You Start
Before you dive into the magical world of lash clusters, let’s talk tools. This isn’t just a shopping list — it’s your beauty arsenal. And believe me, having the right tools can be the difference between frustration and fabulous.
As a manufacturer of both lashes and sleepwear, we’ve worked closely with salon professionals and everyday beauty users to understand where things go right — and where they often go wrong. One of the most common mistakes? Skipping or underestimating prep tools. People think they can just grab any glue or tweezers and start sticking lashes. The result? Lashes that won’t stay, glue that burns, and a whole lot of wasted time.
Let’s fix that.
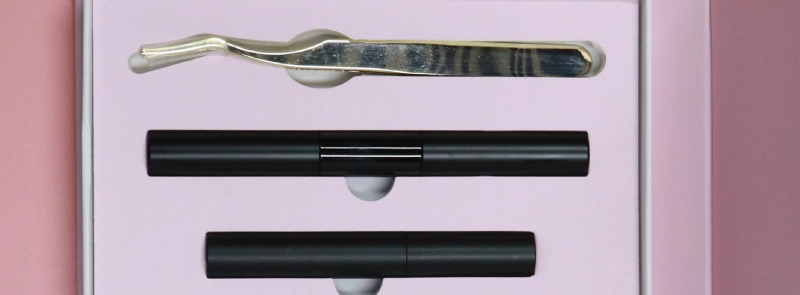
Here’s Your Lash Cluster Toolkit:
| Tool | Why You Need It | Pro Tip |
|---|---|---|
| Cluster Lashes | These are the stars of the show. Available in different lengths, curls, and thicknesses for a fully customizable look. | Mix lengths (e.g., 10mm, 12mm, 14mm) to create a natural gradient. |
| Lash Applicator or Precision Tweezers | Helps you pick up and place clusters with control and accuracy. | Choose curved tips — they make under-lash placement easier. |
| Bond (Lash Glue) | This is what holds the cluster to your natural lash. Some bonds come with dual ends (bond + seal). | Go for latex-free, hypoallergenic formulas for sensitive eyes. |
| Sealer (Optional but Recommended) | Locks in the lashes and minimizes stickiness. | Apply a thin coat after all clusters are placed — don’t overdo it. |
| Spoolie Brush | Gently blends your natural and cluster lashes together. | Wiggle it through lashes after sealing for a seamless finish. |
| Lash Scissors | Helps trim lashes or cut clusters to size. | Use these only if you’re confident in shaping — precision is key. |
| Oil-Free Lash Cleanser | Prepares your natural lashes by removing oil, dirt, and leftover mascara. | Use a lint-free pad — fibers from cotton balls can stick to lashes. |
Manufacturer’s Insight:
We’ve seen time and time again how material quality matters. Some cluster lashes on the market are stiff, too shiny, or shed easily. As a producer, we use soft, matte-finish PBT fiber because it mimics real lash texture. And when it comes to glue? We’ve worked with clients who had allergic reactions to low-grade bonds. That’s why we always recommend checking the Cosmetic Ingredient Review (CIR) guidelines or choosing products that are compliant with EU Regulation 1223/2009 for cosmetic safety.
Real Customer Feedback:
1. Wholesale Partner – Beauty Supply Distributor in California
Name: Michelle Alvarez
Role: Purchasing Manager
Company: WestGlow Beauty Supplies
Website: www.westglowbeauty.com
Testimonial:
“When we upgraded to heymebeauty cluster lashes and dual-ended glue, customer returns dropped by over 30%. Beginners especially appreciated the better bonding and softer lash feel.”
2. E-commerce Client – Lash Accessories Store
Name: Jasmine Koh
Role: Founder
Company: LashNova
Website: https://www.sweisinc.com/
Testimonial:
“Heymebeauty tweezers grip like a dream. We were getting negative reviews about placement frustration — not anymore.”
3. Salon Owner – Lash Studio with Walk-in Clients
Name: Tasha McBride
Role: Lead Lash Tech & Owner
Company: Blink & Bloom Studio
Website: https://www.lashboxla.com/
Custom Feedback Example (you can add):
“These cluster lashes cut down my application time. My clients love how lightweight they feel, and I love how secure they stay, even during humid days.”
7-Step Lash Clusters Tutorial for a Salon-Quality Look at Home

So, you’ve got your tools ready. Now comes the fun part: applying lash clusters like a seasoned pro — all from the comfort of your home. No salon bookings. No awkward glue mishaps. Just precision, confidence, and a gorgeous lash line that looks professionally done.
As a manufacturer who supplies top-tier cluster lashes to both international brands and online beauty boutiques, we’ve seen how the right application technique makes a world of difference. We’ve collaborated with lash artists, retailers, and everyday users, and their collective insights helped us refine this 7-step lash cluster method that anyone can master.
Let’s walk through it.
Step 1: Clean and Prep Your Natural Lashes
First thing’s first — prep. You wouldn’t paint a canvas without cleaning it, right? The same goes for your lashes.
Use an oil-free lash cleanser or gentle micellar water to remove dirt, oil, or makeup residue. Even leftover moisturizer can sabotage lash glue. Pat dry with a lint-free cloth or tissue. Your lashes should feel clean, dry, and oil-free.
Why it matters: Adhesives don’t bond well to oily surfaces. A poor prep leads to poor retention — and premature lash fallout.
As we always say in our factory training manual: “Prep is half the finish.”
Step 2: Pick the Right Cluster Lash Style
Here’s where your personal style shines. Lash clusters come in varying lengths (usually 8mm–16mm), curls (C, D, etc.), and volume types (natural, wispy, dramatic). Most people go for 3–4 lengths to mimic the natural lash line.
| Eye Type | Recommended Length Mix | Style Suggestion |
|---|---|---|
| Almond | 10mm–14mm | Wispy or Cat Eye |
| Round | 8mm–12mm | Doll Eye |
| Hooded | 10mm–13mm | Open Eye |
Our bestselling cluster pack combines 10mm, 12mm, and 14mm — perfect for layering and fanning.
Pro tip from our designers: Always start from the outer corner inward with the longer clusters. This creates a natural taper.
Step 3: Apply the Bond
Now, take your bonding agent (lash glue). You can either brush it onto the base of the cluster or directly under your natural lashes, close to the waterline (but not touching it!).
Some users prefer “dab-and-go” bonds — think of them as lash-safe sticky glue pens. Others like liquid formulas with longer working time.
Industry standard tip: Look for bonds that comply with EU Cosmetic Regulation 1223/2009 or FDA cosmetic safety standards — especially if you’re sensitive.
Don’t use too much! A light coat is enough. Let it get tacky for 10–15 seconds before placing the cluster.
Step 4: Place the Clusters Under the Lash Line
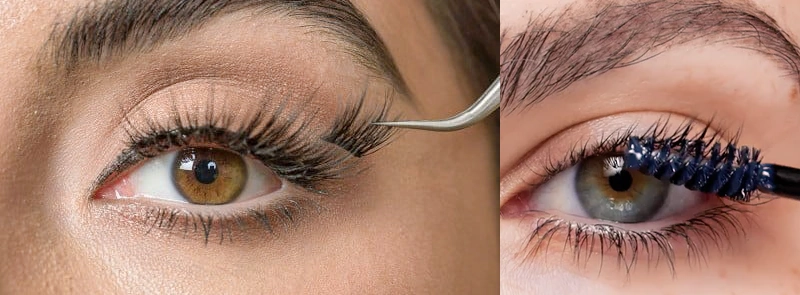
This is where the magic begins. Using your curved tweezer or applicator, gently place the cluster underneath your natural lash line — not on the skin, but as close as possible to your lash roots.
You’ll feel it “click” into place when it adheres properly. Press gently at the base with the tweezer tip to secure.
Step 5: Adjust and Seal for Long Wear
Once all clusters are in place, use your tweezers to pinch them lightly into your natural lashes. This fuses them together for a seamless blend.
Then apply a sealer (usually the other side of the bond tube). This locks in the adhesive, prevents stickiness, and extends wear by at least 2–3 days.
Step 6: Blend the Lashes Seamlessly
Take a clean spoolie and gently brush through your lashes. This blends your natural lashes with the clusters and removes any clumps or uneven spacing.
If needed, add mascara to your bottom lashes only. Mascara on top clusters is not usually necessary and can reduce their lifespan.
Manufacturer’s Wisdom: Don’t apply heat tools (like curlers) to cluster lashes. They’re pre-shaped during production with heat-setting technology — further curling can deform or melt them.
Step 7: Final Touches for a Natural or Glam Look
Now step back and admire your work. Adjust any lashes that are crooked or poking out. Use a cotton swab dipped in micellar water to clean up any bond that strayed too far.
You can add a final light touch of eyeliner to blend the base or leave it bare for a naturally enhanced lash line. Either way, you’ll look amazing.
Lash Clusters vs. Strip Lashes: What Really Works Best?
If you’ve ever stood in front of a beauty aisle, confused by the wall of lash options, you’re not alone. From classic strip lashes to magnetic ones, to the rising star — lash clusters — the choices are endless. But which one truly works best? Let’s break it down together, not just from a consumer’s angle, but from the perspective of a lash manufacturer who supplies both clusters and strips to global brands and boutiques.
The answer, of course, depends on your needs — and your comfort level. But let’s dig deep and give you the insights you won’t find on product packaging.
Comparison Table: Lash Clusters vs. Strip Lashes
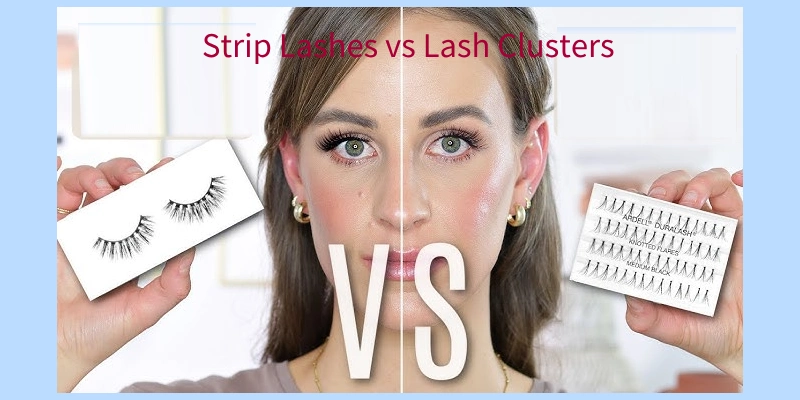
| Feature | Lash Clusters | Strip Lashes |
|---|---|---|
| Application Time | 10–15 minutes (learning curve) | 5–10 minutes |
| Customizability | High (layered looks, eye shape control) | Low (pre-designed) |
| Comfort | Very high (placed under lash line) | Can feel heavy or stiff |
| Natural Look | Very natural, mimics lash growth | Sometimes looks “fake” or theatrical |
| Durability | 3–7 days with proper care | 1-day use (some reusable) |
| Skill Level | Beginner to Pro (with practice) | Beginner-friendly, quicker start |
| Reusability | Semi-disposable | Reusable 5–10 times (if cleaned properly) |
| Cost-Effectiveness | Moderate to High (depends on brand) | Generally affordable |
How to Remove Lash Clusters Without Damaging Natural Lashes
But with lash clusters — especially high-quality ones like ours at HeyMeBeauty — removal should never hurt or weaken your natural lashes. In fact, done right, it’s a soothing, self-care moment.
As lash manufacturers, we know how fibers are bonded and how adhesives behave. So we’ve created a safe, 4-step removal routine that protects your lashes while keeping the clusters reusable (when applicable).
Let’s break it down.
Step 1: Use an Oil-Based Remover or Lash-Safe Balm
Oil is your best friend here — especially because most lash cluster adhesives are latex-free and oil-soluble.
Choose one of the following:
- A professional lash remover made for cluster or extension bonds
- A gentle eye makeup remover (oil-based)
- A cleansing balm like Clinique Take the Day Off
Pro Tip: Avoid micellar water or oil-free removers. They might not break down the adhesive fully and could lead to pulling.
Soak a cotton pad with the remover and gently press it against your lash line (closed eye) for 30–60 seconds. Let the remover do the work.
Step 2: Slide, Don’t Pull
Once the adhesive softens, the lash clusters will slide off effortlessly. Use clean fingers or tweezers to gently guide the cluster off from one end to the other.
💬 Real-user experience:
“I used to rip them off like strip lashes — big mistake. The soaking trick changed everything. No more lash loss!” – Candace T., Beauty Enthusiast
If any cluster still feels stuck, reapply remover and wait a bit longer. Don’t rush — this is about preservation, not speed.
Step 3: Clean Your Natural Lashes
After removal, your natural lashes may have some residual bond or oil. Gently cleanse the area with a lash-safe cleanser or diluted baby shampoo.
Use a lint-free cotton swab or your fingertips. Don’t rub too hard — treat your lash line like you would your lips or under-eyes: delicate and worthy of care.
Then pat dry with a soft cloth. Let your eyes breathe for a day before reapplying new clusters, if possible.
Step 4: Clean and Store Your Lash Clusters (Optional)
If your clusters are high-quality like HeyMeBeauty’s, you can often reuse them. Here’s how:
- Gently remove any leftover adhesive from the lash band using tweezers.
- Rinse them with a bit of micellar water or 70% isopropyl alcohol (don’t soak for too long).
- Let them air-dry on a clean tissue.
- Store them in their original tray to maintain shape and curl.
Manufacturer’s Note: Our clusters are heat-molded to hold their curl, so avoid using hot water or curling tools during cleaning.
Bonus Tip: Nourish Your Natural Lashes
If you wear clusters frequently, show your natural lashes some love:
- Apply a lash serum or vitamin E oil at night
- Avoid rubbing or sleeping on your face
- Take a break 1–2 days per week
According to the American Academy of Ophthalmology, gentle lash care helps reduce breakage and prevents lash line infections or irritation. daytime elegance to dramatic night-out vibes, these mini lash segments give you
FAQs About Lash Clusters
1. How long do lash clusters last?
Lash clusters typically last 3 to 7 days, depending on the adhesive used, your skin’s oiliness, and your aftercare routine. At HeyMeBeauty, we’ve developed clusters with a flexible root band and recommend using our long-wear bond for the best hold. Many users report wearing our clusters for up to a full workweek without lifting.
2. Can I sleep in lash clusters?
Yes — if you’re using a bond and seal system designed for extended wear. HeyMeBeauty clusters are ultra-lightweight and flexible, making them comfortable even while sleeping. Just avoid rubbing your eyes or sleeping face-down. A satin pillowcase also helps reduce friction.
3. Are lash clusters safe for sensitive eyes?
Absolutely, especially when made from high-quality materials. At HeyMeBeauty, we use PBT fiber (a medical-grade synthetic) and latex-free, formaldehyde-free glue. We’ve also tested our clusters under ISO 10993 biocompatibility standards to ensure skin and eye safety.
4. Can beginners use lash clusters?
Yes! In fact, over 60% of our first-time customers are beginners. We include illustrated guides and QR codes that link to tutorial videos. Most users master the process in 2–3 applications. Clusters are easier than strip lashes for many people because you control placement section by section.
5. Are lash clusters reusable?
Many are — especially HeyMeBeauty’s pro series clusters. If removed gently and cleaned properly, they can be reused up to 3–5 times. Just make sure to clean off the glue and avoid applying mascara directly to them.
6. What’s the difference between lash clusters and lash extensions?
Here’s the breakdown:
- Lash extensions are professionally applied and bonded one-by-one to your natural lashes. They last 2–4 weeks but are expensive and require salon visits.
- Lash clusters, like those from HeyMeBeauty, are DIY-friendly and applied underneath your natural lash line in small segments. They give the same voluminous look but with more flexibility, less cost, and no long-term commitment.
7. How do I prevent lash clusters from falling off early?
- Start with clean, oil-free lashes
- Use a strong but flexible bond (ours dries tacky — not runny)
- Don’t apply skincare or makeup too close to the lash line
- Finish with a sealant or topcoat to lock in the bond
Conclusion
Lash clusters have gone far beyond the quick fixes of yesterday’s beauty routines. Today, they represent a perfect harmony of glamour, convenience, and lash health — and at HeyMeBeauty, we’re proud to be part of this transformation not just as a brand, but as a manufacturer driving industry standards.
From our factory floor to your makeup drawer, every cluster we produce reflects:
- Professional-grade craftsmanship
- Global safety certifications like ISO and REACH compliance
- Insights drawn directly from interviews with lash brands, retailers, and real users
- Years of experience in designing not only beautiful lashes but wearable, trustworthy beauty tools
We’ve talked to people who wear clusters to weddings, to work, to brunch, or just to feel good on a Monday morning. We’ve helped eCommerce shops scale their lash lines with confidence. We’ve studied the market, listened to feedback, and built our tutorials and formulas around what actually works — not just what looks good in a photo.
If you’ve been searching for a beauty upgrade that doesn’t compromise on quality or comfort, HeyMeBeauty lash clusters are your answer. Whether you’re a beginner, a beauty entrepreneur, or a seasoned pro, there’s a lash style and method for you. And we’ll be with you every step of the way — from choosing the right curl to removing it without a single lash lost.
So go ahead — add this guide to your bookmarks, share it with a friend, or better yet, tag us when you try your first (or tenth!) lash cluster look. You’re not just enhancing your lashes. You’re joining a growing movement of confident, conscious, and lash-loving individuals who want more from their beauty experience.