![]()
The Open Eye Lash Map is a game-changer for achieving wide, captivating eyes with lash extensions. This guide will walk you through the basics of lash mapping, helping you customize the perfect look that suits your eye shape and style. Whether you’re a beginner or a pro, understanding lash mapping is key to flawless lashes.
Ready to enhance your lash game? Get a quote for stunning lash extensions from HeyMe today!
What is An Open Eye Lash Map?
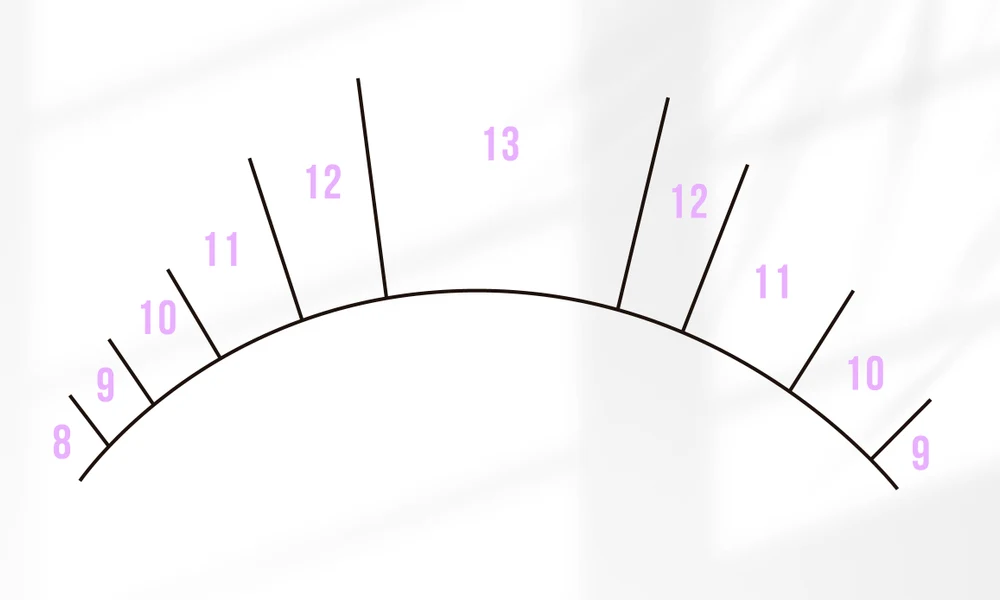
An Open Eye Lash Map is a customized lash mapping technique designed to create the illusion of larger, brighter eyes. Unlike standard lash mapping, which focuses on evenly distributed lengths, the Open Eye Lash Map places emphasis on longer lashes in the center of the eye and shorter ones on the outer corners. This approach opens up the eyes and gives them a wide-eyed, awake look.
Using an Open Eye Lash Map ensures a more flattering, natural result tailored to each client’s eye shape, enhancing their overall lash appearance.
Why Open Eye Lash Mapping Works?
Open Eye Lash Mapping works by enhancing the natural shape of your eyes, creating a wide-eyed, open look. By strategically using different lash lengths and curls, this technique lifts and defines the eyes. Longer lashes in the center and shorter ones on the outer corners open up the eyes, giving them a brighter, larger appearance.
This mapping method creates a beautifully balanced effect, making eyes look more awake and captivating.
Key Elements of Open Eye Lash Mapping
Tailoring Lash Maps to Eye Shapes:
Open Eye Lash Mapping starts with understanding the unique shape of each eye. Whether round, almond, or hooded, adjusting the lash placement helps enhance the natural contours. By focusing on the center of the lash line for longer lashes, this technique creates the illusion of bigger eyes and opens up the gaze, making them appear more awake and bright.
Choosing the Right Lash Curls, Lengths & Thickness:
Lash curls, lengths, and thicknesses are key to achieving the perfect open-eye effect. Choosing a curl that complements the natural lash pattern helps lift the eyes, while varying lengths and thicknesses add depth and dimension. This combination creates a balanced, natural look, enhancing the eye’s shape and size without overwhelming the lashes.
Mapping Lash Zones (Inner, Middle & Outer Sections):
The lash map is divided into three sections: inner, middle, and outer. In the inner section, use shorter lashes to maintain a natural flow. For the middle, longer lashes enhance the open-eye effect, and in the outer section, slightly shorter lashes create a smooth, flattering transition. This method ensures a balanced, wide-eyed look that suits any eye shape.
10 Steps For a Perfect Open Eye Lash Map
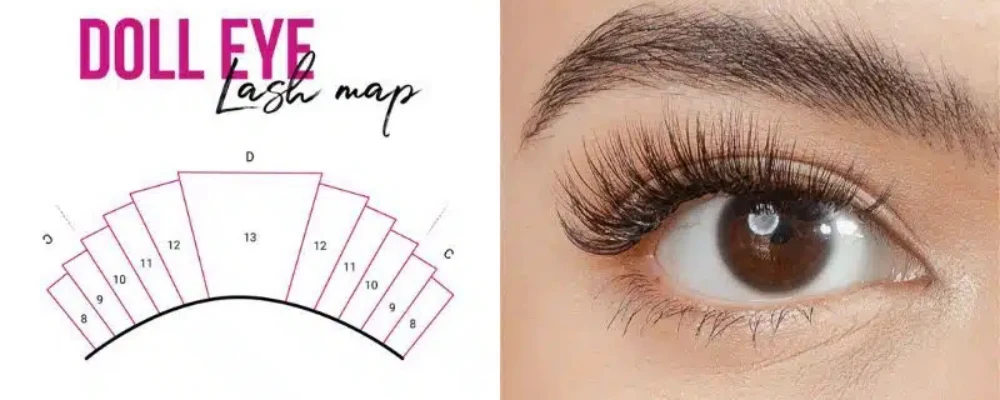
Step 1: Client Consultation
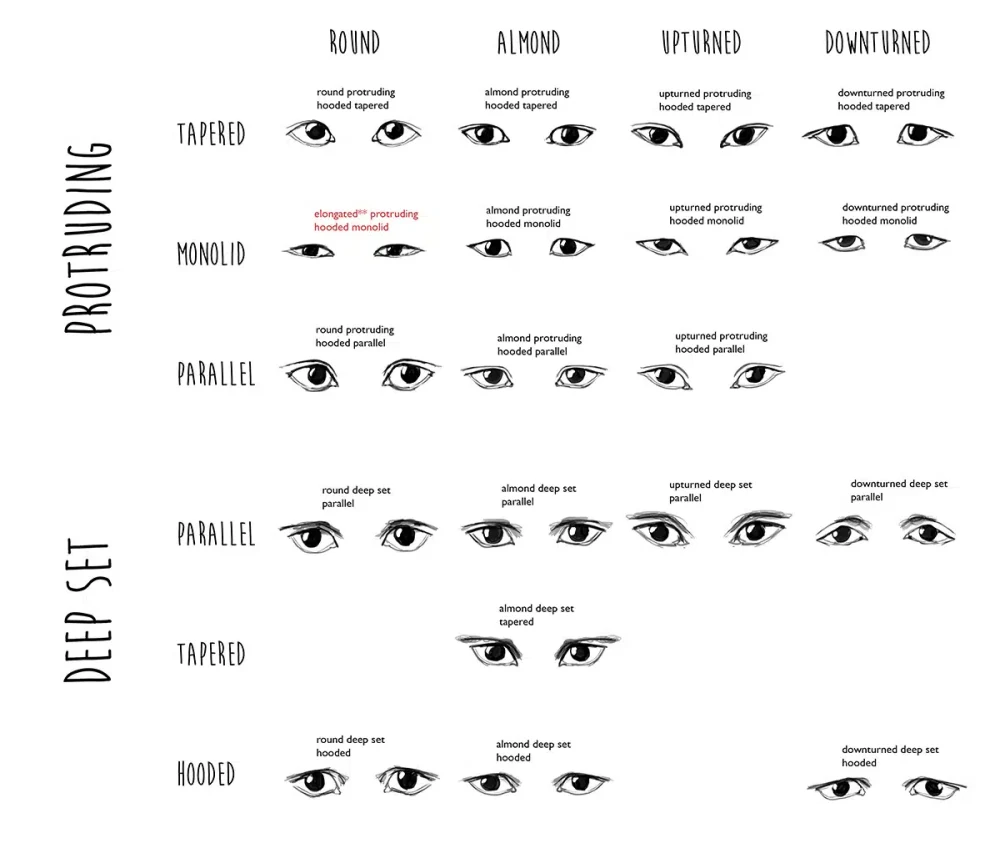
Start with a consultation to understand the client’s preferences, eye shape, and desired lash look. Discuss options for lash lengths, curls, and styles that will best enhance their eyes and create the perfect open-eye effect. This step ensures a personalized approach and sets clear expectations for the final result.
Step 2: Clean Natural Lashes and Apply Primer
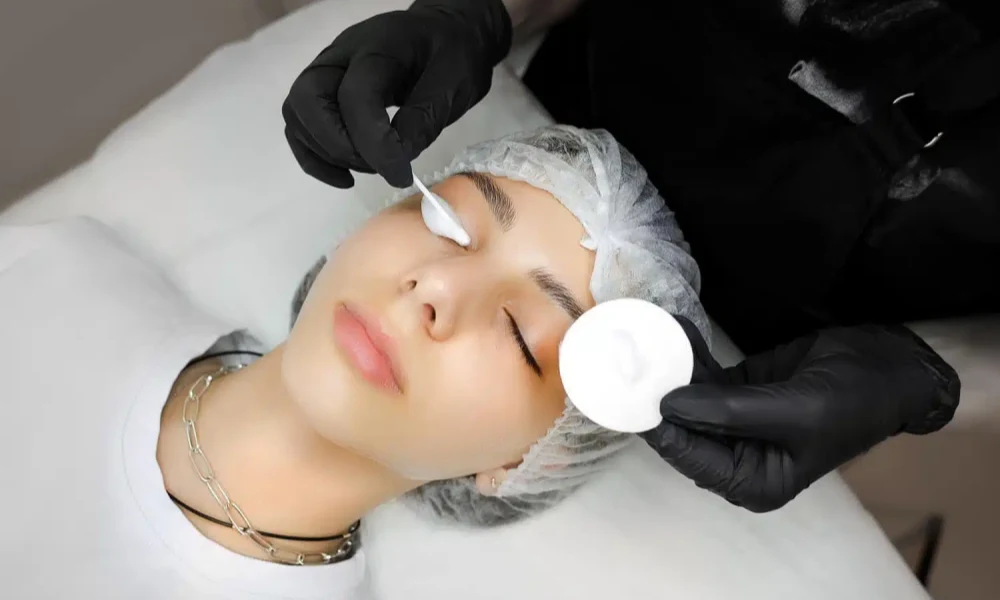
Clean the natural lashes to remove any oils, dirt, or makeup. This ensures the lash adhesive bonds securely. Apply a lash primer to prep the lashes, making them more receptive to the adhesive and helping the extensions stay in place longer for a flawless finish.
Step 3: Place Under-Eye Patches
Position under-eye patches to protect the delicate skin and hold lower lashes in place. These patches prevent the upper and lower lashes from sticking together during the application process and provide comfort for the client while keeping the focus on the top lashes.
Step 4: Map the Lash Line for Open Eye Effect
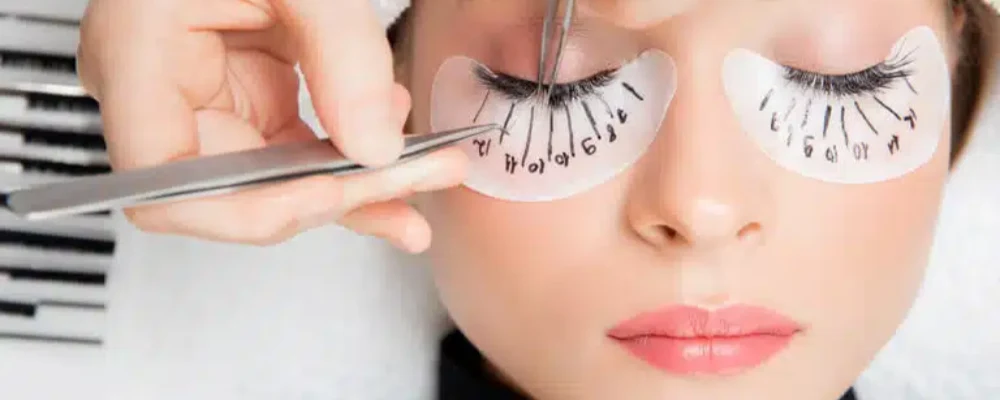
Carefully map the lash line to create the open-eye effect. Focus on placing longer lashes in the center of the eye to give the illusion of bigger, more awake eyes. Shorter lashes will go on the outer corners, while the inner corner should have lashes that gradually taper for a natural flow.
Step 5: Select Lash Lengths
Choose the right lash lengths for each section of the eye, taking the client’s natural lash length and desired look into account. Use longer lengths in the middle of the lash line for maximum impact and shorter lengths on the outer and inner sections to maintain balance and enhance the open-eye effect.
Step 6: Isolate Individual Lashes
Carefully isolate each natural lash to ensure the extensions attach properly. Use tweezers to separate the lashes one by one, preventing clumping and ensuring that each extension is applied to a single natural lash for a clean, precise result.
Step 7: Apply Lash Adhesive
Apply the lash adhesive to the base of each extension, making sure to use just the right amount to avoid excess. The adhesive should be strong enough to hold the extensions in place without damaging the natural lashes. Always use high-quality adhesive to ensure long-lasting results and client safety.
Step 8: Attach Eyelash Extensions
Attach the extensions to the isolated natural lashes, following the map you’ve created. Start with the longer lashes in the center and work your way outward, making sure each extension is applied securely and evenly. This will create the desired open-eye effect that frames the client’s eyes beautifully.
Step 9: Perform Final Check and Make Adjustments
Once all the extensions are applied, do a thorough check to ensure everything looks balanced and flawless. Adjust any uneven areas by replacing extensions or adding more if needed. This final touch-up ensures the lashes look symmetrical and enhance the client’s eye shape perfectly.
Step 10: Allow Lash Adhesive to Dry
Allow the lash adhesive to fully dry before finishing the session. This ensures the extensions stay in place without risk of lifting or movement. Give the client instructions on how to care for their new lashes and let them know the drying time may vary, but typically takes about 24 hours.
Tips for Perfecting Your Open Eye Lash Map
| Tip/Trick | Description |
|---|---|
| Common Mistakes to Avoid | Avoid using one lash length for the entire lash line; it makes the eyes look flat. |
| Adjusting for Different Eye Shapes | Tailor the lash map to each eye shape. For hooded eyes, use more length in the center. |
| Creating a Natural Yet Dramatic Look | Blend shorter and longer lashes seamlessly. Use curls that lift the eyes without looking overdone. |
Who Is Suitable for Open Eye Style Lash Extensions?
Clients with Hooded Eyes: Open Eye style works wonders for hooded eyes. By placing longer lashes in the center and shorter ones at the corners, it lifts the eyelids, creating the illusion of larger, more awake eyes. This mapping technique helps enhance the natural shape while opening up the gaze.
Those Seeking a Wide-Awake Look: Open Eye lash extensions are perfect for anyone wanting a fresh, bright-eyed appearance. The focus on lengthening the center of the lash line creates a wide-eyed effect, making the eyes look more alert and youthful. This style suits anyone desiring to enhance their eyes with a natural yet striking look.
People with Small Eyes: Small eyes can benefit from Open Eye lash extensions as they create the illusion of bigger eyes. The longer lashes in the center of the eye make them appear wider, while the shorter lashes at the outer corners provide balance. This style gives small eyes more dimension and depth, without appearing too dramatic.
Clients with Downturned Eyes: For downturned eyes, Open Eye lashes help lift the outer corners and brighten the entire eye. By placing longer lashes in the middle and tapering to shorter ones at the outer corners, this technique gives a more lifted, youthful appearance, making the eyes look more open and energized.
Conclusion
In conclusion, mastering the Open Eye Lash Map allows you to create a beautifully wide-eyed, youthful look. By customizing lash lengths and curls to suit individual eye shapes, you can enhance natural beauty and achieve a captivating, open-eye effect. Ready to transform your lash game? Get the perfect lash extensions and quote with Heyme today for a flawless, custom Open Eye Lash Map!
FAQ
How do you know your lash map?
You can determine your lash map by analyzing your eye shape and deciding where you want more volume. For example, longer lashes in the center create a wide-eyed look, while shorter lashes at the outer corners provide balance.
What lash style is best to open eyes?
The Open Eye Lash Map is the best for creating a wide, awake look. It focuses on placing longer lashes in the center of the lash line and shorter ones at the outer corners to enhance the natural eye shape and give the illusion of larger eyes.
What is the most popular lash map?
The Cat Eye Lash Map is one of the most popular styles. It focuses on longer lashes at the outer corners and shorter lashes at the inner corner, creating a dramatic, lifted look that enhances the natural shape of the eyes.
How to get better at lash mapping?
Practice is key! Study different eye shapes, experiment with lash lengths and curls, and try mapping out different styles. The more you work on it, the better you’ll understand what works for each eye shape and desired look.
How to measure eyes for lash extensions?
To measure the eyes for lash extensions, use a lash ruler or your own set of tweezers. Measure the width of the eye to ensure lashes are proportionate. Focus on adjusting lash lengths based on the natural eye shape and desired effect, such as longer lashes in the center for an open-eye look.
