![]()
A lash lift is a great way to achieve beautifully curled, no need to wear false eyelashes,natural-looking lashes without the hassle of eyelash curlers or mascara. While lash lifts are typically done at a salon, many beauty enthusiasts are discovering the benefits of performing this treatment at home. If you’re curious about how to do a lash lift at home and want to achieve professional-looking results, you’ve come to the right place.
The hottest trend in 2025: at home lift and at home lashes

In this article, we’ll walk you through everything you need to know, from the tools and products required to the step-by-step process and tips for success. Let’s dive into the world of DIY lash lifts!
What is Lash Lift
A lash lift is a cosmetic treatment designed to enhance the appearance of your natural eyelashes. It involves curling and lifting the lashes from the base, which can make them look longer and more defined.
The process typically uses a specialized perm solution and silicone rods to shape the lashes, creating a gentle lift without the need for extensions or false lashes. The results can last anywhere from 6 to 8 weeks, giving a more open and awake look to the eyes.
What You Need for a Lash Lift at Home
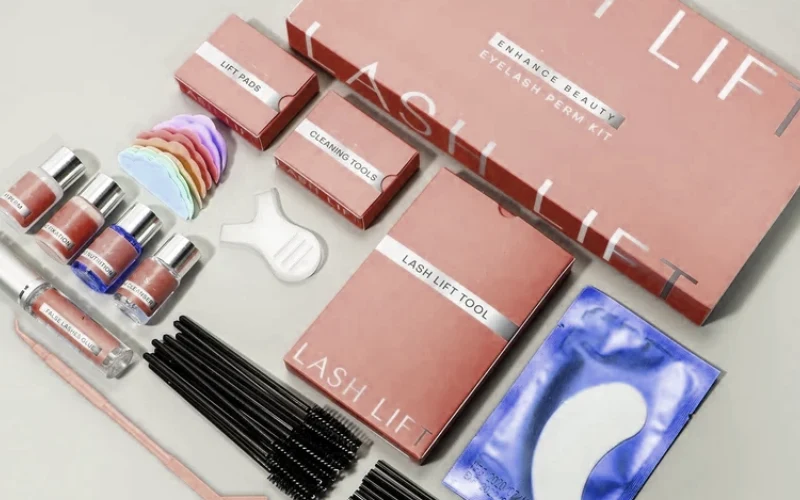
To perform a lash lift at home, you’ll need a few essential products. Many lash lift kits are available online, which contain everything you need to get started. Here’s a breakdown of what you’ll need:
- Lash Lift Kit
- Perming Solution: This is the main product that lifts and curls your natural lashes. It softens the lash hair, making it more pliable to reshape.
- Neutralizing Solution: After perming, this product locks in the curl by stopping the chemical process.
- Lash Lift Pads: These silicone pads are what your lashes will be attached to during the process. They come in different sizes, so make sure you pick the right one for your eye shape.
- Applicators and Brushes: You’ll need these tools for applying the perm and neutralizer solutions. Small, precise brushes work best to avoid getting the product in your eyes.
- Lash Adhesive: This is used to attach the lash lift pads to your eyelids and to secure your lashes onto the pads.
- Cleanser: A gentle lash cleanser to remove oils and makeup from your lashes and the surrounding skin before starting the lift.
- Preparation Materials
- Tissues or Cotton Pads: These are helpful for wiping off excess product or for cleaning up any spills during the procedure.
- Timer: Accurate timing is crucial for a lash lift. You’ll need a timer to ensure that the perming solution is on for the right amount of time.
- Towel or Cloth: To protect your clothing or catch any drips from the products.
Step-by-Step Guide to Doing a Lash Lift

With all your materials prepared, it’s time to begin the lash lift process. Follow these simple steps to lift and curl your lashes at home.
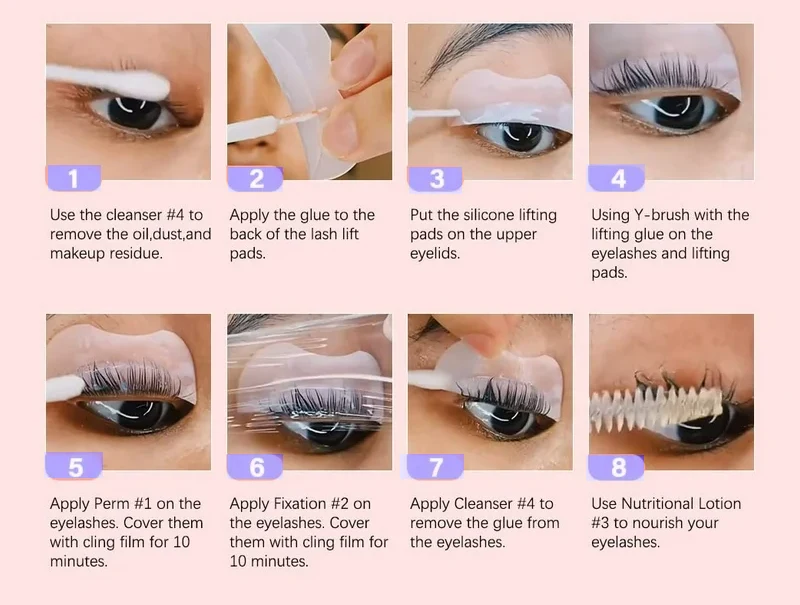
1. Prep Your Lashes and Eye Area
Before applying any products to your lashes, it’s essential to thoroughly clean the eye area. Here’s how to get started:
- Remove Makeup: Use a gentle makeup remover to take off any mascara, eyeshadow, or eyeliner. Ensure that your lashes are free of makeup and oils to prevent interference with the lift.
- Clean the Lashes: Wash your lashes with a mild cleanser or lash shampoo to remove any residual oils or dirt. This will help the products to adhere better.
- Protect Your Skin: Apply under-eye gel pads or use medical tape to protect the lower lashes and the surrounding skin. These pads will keep your lower lashes separated and prevent them from getting stuck to the upper lashes during the procedure.
2. Apply the Lash Lift Pads
Now it’s time to apply the silicone pads that will give your lashes their shape.
- Select the Right Size Pad: Lash lift pads come in different sizes. You’ll want to choose one that fits the curvature of your eye. Smaller pads create more curl, while larger pads give a more natural lift.
- Secure the Pads: Use the lash adhesive to carefully stick the pads to your upper eyelids, directly above your lashes. Make sure the pad is aligned properly with your lash line to avoid any uneven results.
- Attach Your Lashes: Gently brush your lashes onto the silicone pad, using a lash applicator. Be careful not to tug or pull on your lashes. The goal is to ensure that the lashes are neatly spread out and attached to the pad.
3. Apply the Perming Solution
The perming solution is the product that will reshape your lashes into their lifted form.
- Apply the Perming Solution: Use a clean applicator or brush to apply a small amount of the perming solution to the lashes. Start at the base and work your way to the tips of the lashes. Be sure to cover every lash evenly, but avoid getting the solution on the skin.
- Timing: Let the perming solution sit for about 10-15 minutes, depending on the strength of the solution and your lash type. Thicker lashes may need a bit more time, while finer lashes will require less.
- Check the Process: It’s essential to check the curl every 5 minutes to avoid overprocessing. If you’re unsure, it’s better to remove the solution early than leave it on too long.
4. Neutralize the Lashes
Once the perming solution has done its job, you’ll need to neutralize the lashes to stop the perming process.
- Apply the Neutralizing Solution: Use a clean brush to apply the neutralizing solution to the lashes. Make sure to cover all of the lashes evenly.
- Leave the Neutralizer On: Let the neutralizing solution sit for about 5-10 minutes, depending on the product’s instructions. This step locks in the curl and ensures the shape stays in place.
- Clean Up: After the time has passed, gently remove the solution with a clean cotton pad or tissue.
5. Remove the Pads and Clean Up
With the lift complete, it’s time to remove the pads and tidy up your lashes.
- Peel Off the Pads: Carefully peel off the silicone pads from your eyelids, being careful not to tug on your lashes.
- Cleanse the Area: Use a gentle cleanser or makeup remover to wipe away any excess product and clean your lashes.
6. Final Touches and Aftercare
Your lashes are now beautifully lifted and curled! Here are some final steps and aftercare tips:
- Brush Through Your Lashes: Using a clean spoolie or lash comb, gently brush through your lashes to separate them and enhance the curl.
- Avoid Water and Makeup for 24 Hours: To allow the perm to set, avoid getting your lashes wet for at least 24 hours. This includes refraining from applying mascara or using any eye makeup remover.
- Nourish Your Lashes: To keep your lashes healthy, consider applying castor oil or a nourishing lash serum to strengthen and condition them after the lift.
Common Mistakes to Avoid When Doing a Lash Lift
While a lash lift is a straightforward process, there are a few common mistakes that can lead to less-than-ideal results:
- Overapplying the Perm Solution: Applying too much perming solution can damage your lashes or cause an overly tight curl. Use the product sparingly and follow the recommended timing.
- Incorrect Placement of the Lash Pads: The pads must be placed in alignment with the natural curve of your lashes. If the pads are off-center or placed too high or low, you could end up with uneven curls.
- Ignoring Timing Instructions: Timing is crucial when it comes to the perming and neutralizing solutions. Leaving either solution on for too long can result in brittle or overprocessed lashes.
Tips for Long-Lasting Results
- Avoid Water for the First 24 Hours: After a lash lift, your lashes are more sensitive to moisture. Try to avoid getting them wet for at least 24 hours to ensure the curl holds.
- Don’t Rub Your Eyes: Rubbing your eyes can disturb the curl and cause your lashes to lose shape.
- Use a Lash Conditioner: A lash serum or nourishing oil can help keep your lashes strong and healthy, promoting longer-lasting results.
FAQs
Is it safe to do a lash lift at home?
While it is possible to do a lash lift at home, it requires careful application of products and attention to safety protocols to avoid irritation or damage to your eyes and lashes.
What do I need for a lash lift at home?
You will typically need:
- Lash lift kit (includes perm solution, setting solution, and nourishing solution)
- Silicone lash lift pads
- A small brush or applicator
- Adhesive (if required)
- Cotton swabs and pads
- A lash comb
How long does a lash lift last?
A lash lift can last anywhere from 6 to 8 weeks, depending on your natural lash growth cycle and aftercare.
Can I do a lash lift if I have short or sparse eyelashes?
Yes, a lash lift can work on short or sparse lashes, but the results may be less dramatic compared to longer lashes.
How long does the process take?
The entire process typically takes about 45 minutes to an hour, including preparation and application.
Can I wear makeup after a lash lift?
It’s best to avoid mascara and eye makeup for the first 24 hours to allow the lift to set properly. After that, you can apply makeup but avoid waterproof formulas, which can be harder to remove.
How do I prepare my lashes for a lift?
Make sure your lashes are clean and free of makeup and oils. Avoid using any products that could leave residue the day of the treatment.
What are the risks of a lash lift at home?
Potential risks include eye irritation, allergic reactions, uneven lifting, and damage to the lashes if not done correctly. Always follow instructions carefully.
Tips for a Successful Lash Lift
- Read the instructions thoroughly before starting.
- Conduct a patch test if you’re using a new product.
- Make sure to have all your tools ready and organized for quick access.
- Take your time during application to avoid mistakes.
Conclusion
A lash lift is an excellent way to enhance the natural beauty of your lashes without the need for extensions or mascara. By following these simple steps and using the right products, you can easily achieve a professional-quality lash lift at home. With a little patience and practice, you’ll be able to enjoy beautifully lifted lashes that last for weeks.
Remember to take your time, follow the instructions carefully, and don’t be afraid to experiment to find the technique that works best for you. With the right tools and a little practice, you’ll soon have the perfect DIY lash lift!
