![]()
Are you dreaming of long, luscious lashes without the salon price tag?
Look no further! In this comprehensive guide, we’ll take you on a step-by-step journey through the world of DIY lash extensions. From choosing the right products to mastering application techniques, we’ll cover everything you need to know to achieve salon-quality results in the comfort of your own home.
Whether you’re a seasoned beauty enthusiast or a complete novice, this guide is your passport to flawless lashes. Get ready to elevate your beauty routine and embrace your inner lash artist!
What Is Lash Map

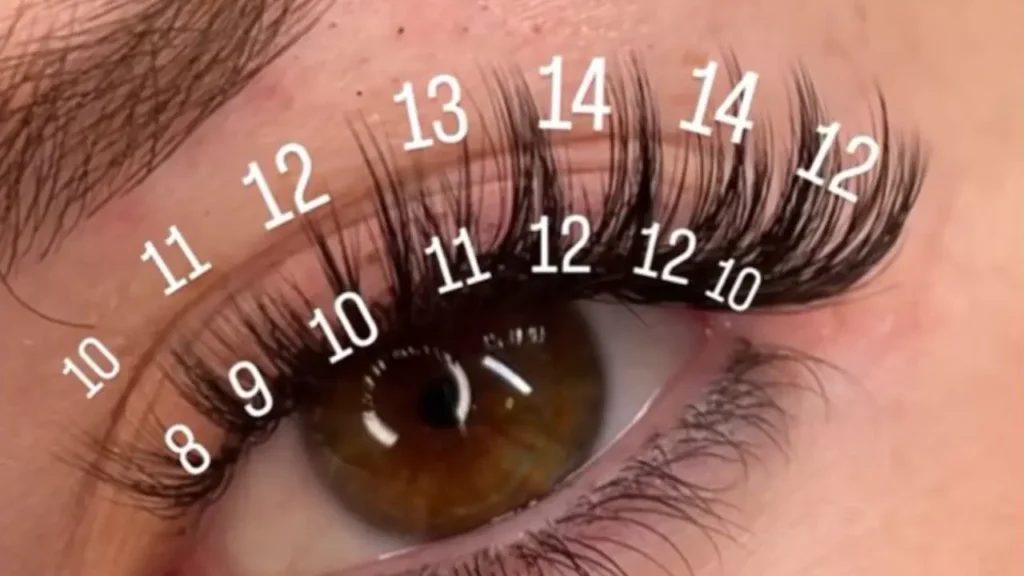
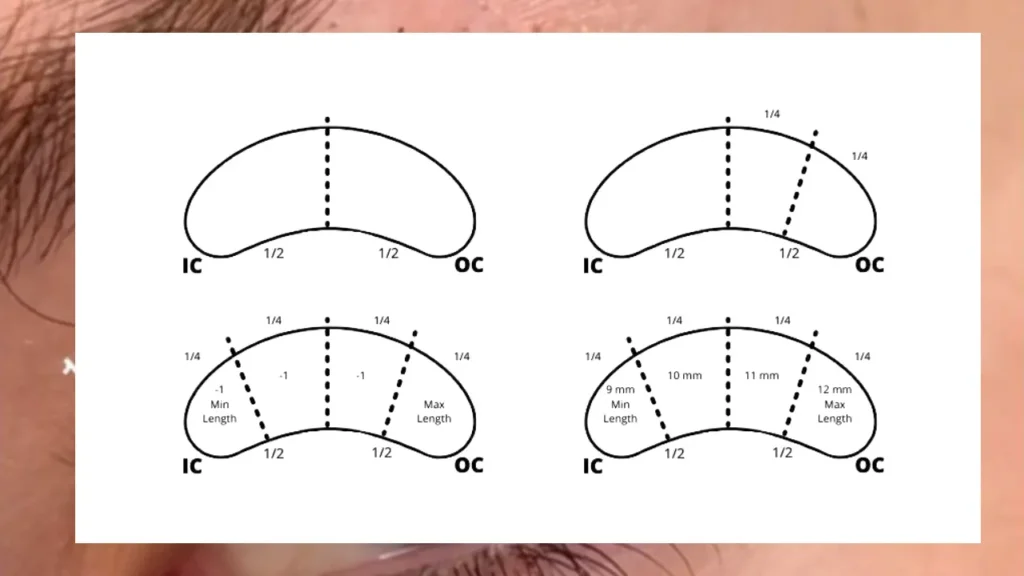
A lash map is a visual guide used by lash technicians to plan and execute a custom lash look. It outlines the desired length, curl, and placement of individual lash extensions. Lash maps help ensure consistency, symmetry, and a beautiful, natural-looking result.
Key Elements of a Lash Map:
- Eye Shape: The shape of the eye influences the placement and style of the lashes.
- Desired Look: Whether it’s a natural, dramatic, or doll-eye effect, the lash map will dictate the specific lash lengths and curls.
- Lash Placement: The map outlines where each lash extension should be placed on the natural lash line.
- Curl Pattern: The curl pattern determines the overall shape and direction of the lashes.
By following a well-crafted lash map, lash technicians can achieve precise and stunning results.
Why Lash Extension Map Is Important
A lash extension map is a blueprint for creating the perfect lash look. Here’s why it’s so important:
Symmetry and Balance:
- A well-executed map ensures both eyes have a symmetrical and balanced lash line.
- It helps avoid any discrepancies in length, curl, or thickness between the two eyes.
Enhanced Eye Shape:
- Different lash maps can be used to accentuate or modify the natural shape of the eye.
- For instance, a cat-eye map can elongate round eyes, while a doll-eye map can open up hooded eyes.
Desired Aesthetic:
- Whether you want a natural, dramatic, or glamorous look, a lash map helps you achieve your desired aesthetic.
- It allows you to visualize the final result before starting the application process.
Efficient Application:
- A pre-planned map saves time and reduces the chances of mistakes.
- It helps you work efficiently and consistently, ensuring a faster and more precise application.
Client Satisfaction:
- A well-executed lash map leads to satisfied clients.
- It ensures they receive the desired look and feel confident in their appearance.
How to Make Lash Extension Map

A lash map is a visual guide that outlines the desired length, curl, and placement of individual lash extensions. It’s a crucial tool for achieving a consistent and beautiful lash look.
Here’s a step-by-step guide on how to create a DIY lash extension map:
1. Assess Your Client’s Eye Shape:
- Almond: This versatile eye shape can accommodate various lash styles.
- Round: Longer outer lashes can create a more elongated look.
- Hooded: Shorter lashes on the inner corners and longer lashes on the outer corners can help to open up the eyes.
- Downturned: Longer lashes on the outer corners can lift the eye.
- Close-Set: Longer lashes on the outer corners can create the illusion of wider-set eyes.
- Wide-Set: Shorter lashes on the outer corners can bring the eyes closer together.
2. Choose the Right Lash Curls and Lengths:
- Curl: Different curls, such as J, C, CC, and D, can create various lash effects.
- Length: The length of the lashes should complement the client’s natural lashes and desired look.
3. Create a Visual Map:
- Sketch: Use a simple diagram to sketch the desired lash pattern.
- Mark the Lash Line: Divide the lash line into sections to visualize the placement of different lash lengths and curls.
- Label the Lash Map: Clearly label the desired lash length and curl for each section.
4. Consider the Desired Look:
- Natural: Use shorter lashes and a more natural curl pattern.
- Dramatic: Opt for longer lashes and a more dramatic curl.
- Doll Eye: Create a wide-eyed effect with longer lashes on the outer corners.
- Cat Eye: Achieve a sultry look with longer lashes on the outer corners.
By following these steps and considering your client’s individual needs and preferences, you can create a personalized lash map that will help you achieve stunning results.
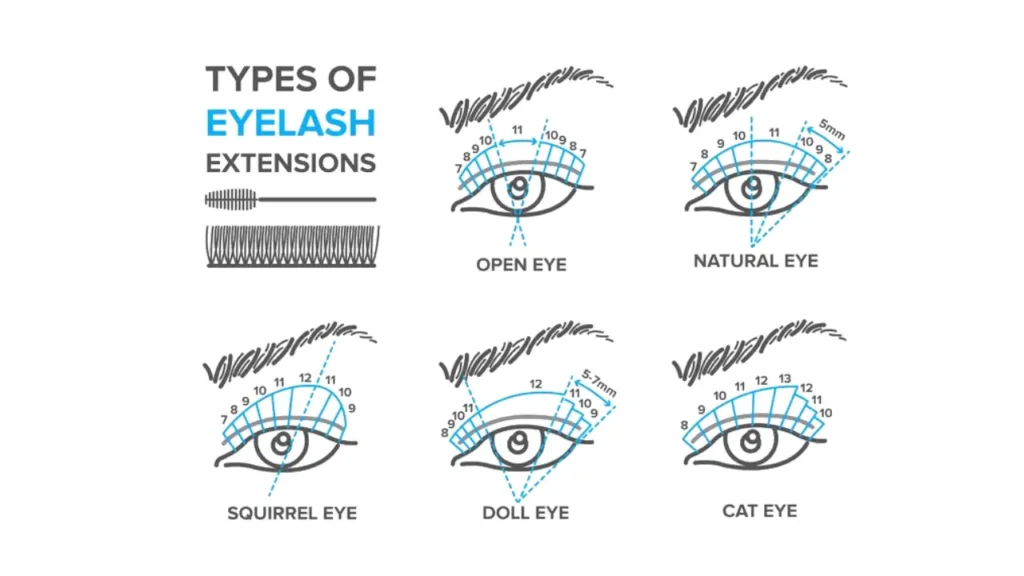
Lash Mapping Styles

There are many different lash mapping styles to choose from, each with its own unique look. Here are some of the most popular styles:
- Natural: This style uses shorter lashes to create a subtle, everyday look.
- Doll: This style uses longer lashes to create a wide-eyed, doll-like effect.
- Cat eye: This style uses longer lashes on the outer corners of the eyes to create a sultry, cat-eye effect.
- Open eye: This style uses longer lashes on the outer corners of the eyes and shorter lashes on the inner corners to create a more open and awake look.
- Kim K: This style uses longer lashes in the center of the eyes to create a dramatic, Kardashian-inspired look.
The best lash mapping style for you will depend on your personal preferences and the shape of your eyes. It is important to consult with a qualified lash technician to determine the best style for you.
How to Choose DIY Lash Extension Map
A well-planned lash map is crucial for achieving the desired look with your DIY lash extensions. Here’s a breakdown of factors to consider when selecting a map:
1. Eye Shape:
- Round Eyes: A cat-eye or doll-eye map can help elongate the eyes.
- Almond Eyes: Most styles work well, but a natural or doll-eye map can enhance their shape.
- Hooded Eyes: A cat-eye or open-eye map can lift the lid and create a more defined look.
- Downturned Eyes: A doll-eye or open-eye map can lift the outer corners.
2. Desired Look:
- Natural: Opt for shorter lengths and a more sparse application.
- Dramatic: Choose longer lengths and a fuller application.
- Cat-Eye: Focus on longer lengths on the outer corners.
- Doll-Eye: Use longer lengths in the center of the eye.
3. Skill Level:
- Beginner: Start with a simple, natural map.
- Intermediate: Experiment with more complex styles like cat-eye or doll-eye.
- Advanced: Try more intricate designs like hybrid or volume styles.
Tips for DIY Lash Extension Mapping:
- Practice: Before applying lashes, practice mapping on a doll head or lash pad.
- Use a Lash Map Pen: This tool helps you visualize the desired look and ensure symmetry.
- Consider the Occasion: Choose a style that suits the event or occasion.
- Start Small: If you’re new to DIY lash extensions, start with a simple, natural style.
- Patience is Key: Take your time and be patient, especially when applying individual lashes.
By carefully considering these factors and practicing regularly, you can create stunning DIY lash extensions that enhance your natural beauty.
Would you like to see some visual examples of different lash maps?
Conclusion
Ready to embrace the beauty of luscious lashes without breaking the bank? Our comprehensive guide empowers you to master the art of DIY lash extensions. From selecting the perfect supplies to perfecting application techniques, we’ve covered every step to ensure stunning results.
Remember, practice makes perfect. Start with patience and precision, and soon you’ll be creating salon-quality lashes in the comfort of your own home.
Want to skip the DIY hassle? Let our expert lash technicians handle the magic. Contact us today for a personalized DIY lash extension consultation and experience the difference.
